Fashion Revolution Week was April 24-30, and I made this project during that week, but I just had not photographed it or blogged about it until now. Only a month late!
Fashion Revolution is a movement to raise awareness about the human and ecological impact of the clothing industry. http://fashionrevolution.org/
Fashion Revolution Week happens on the anniversary of the Rana Plaza factory collapse, where 1,138 garment workers in Bangladesh were killed and many more injured on 24th April 2013. more than half the victims were women. The day before the collapse, large cracks were showing, but the next day, garment workers were ordered to return to work or else they'd be docked a month's pay. The clothing sweatshops in the building made clothes for many brands, including cheap fast-fashion brands Primark, Walmart, and more expensive brands like Benetton. People often think that more expensive brands of clothing will have better worker pay and working conditions, but it's not always true.
The hashtag #whomademyclothes is used on twitter for consumers to ask various brands for transparency about their production.
In addition to the poor working conditions of many garment workers around the world, there are large ecological issues with the entire fashion industry. Even if the workers are well paid and have safe conditions, the clothing and textile industry produces very much chemical waste and pollution. The entire life cycle of a garment (from growing the cotton, milling the fabric, dyeing, cutting and sewing) consumes so much water. It takes around 1,800 gallons of water to grow enough cotton to produce just one pair of jeans.
With the current sped-up fashion cycle where trends only last a few months and clothing is so cheap, clothing is purchased and quickly thrown away in huge quantities. Americans alone throw away approximately 14 million tons of garments each year, and most of this does not decompose in landfills because even if it's biodegradable (like cotton), it is usually inside plastic bags or does not receive enough oxygen to break down. Clothing is not frequently recycled, and it's a difficult process when a single garment may be a blend of different fibers. It's not like aluminum cans where you can just melt it all down.
I also recommend the movie called "The True Cost" , about the fast fashion/disposable fashion problem.It's on Netflix and Youtube.
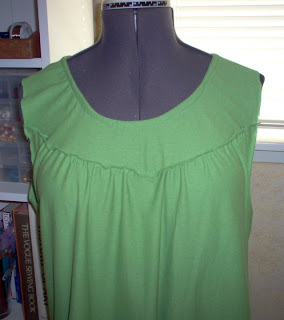
I've drastically cut back the amount of clothing I buy, but I do still like to make clothes, it's a creative outlet even if I don't always need more clothes. Even though homemade clothes are not exploiting workers, there is still the issue of the fabric, where was it made, etc. Fabric production has the same ecological issues as clothing production. So my project for Fashion Revolution week used my own labor and used scrap fabric that I had left over from older projects. The scraps weren't big enough to make a whole garment from, but I combined a solid knit with a floral knit to make this top. It's a simple cap sleeved top but the fabric splicing gives it more visual interest than a T-shirt.
Showing posts with label crafts. Show all posts
Monday, May 29, 2017
Monday, May 8, 2017
What am I making
I made these tiles a couple
of years ago in a ceramics class, but I just glued them to a board and grouted them this past weekend. I'm trying to finish incomplete projects and use up materials from my craft hoard.
When I made the tiles, I just glazed them random colors
instead of having a set picture in mind of how they would fit
together. So it is a somewhat random layout, I just tried to make a
couple of sort-of continuous diagonal stripes. I don't know if I will use this for a table or just an outdoor decorative thing. It's about 18" square so it could be a small table but I might hang it on the wall of the back patio.
I do wish I had glazed the colors more in a planned way to make a more cohesive design.
This is so weird, in the edit screen this is all normal lowercase but in the published post, it shows all caps. I swear I did not type this whole post in capslock and I don't know why it's showing that way!
Monday, March 27, 2017
What I'm making
I found this large candlestick thingy on the curb last week. A neighbor had a pile of random items out with a FREE sign, and this looked interesting, like it had some potential.
I did not like the paint job, it was a weird mix of antique gold and a strange silvery bluish color.
I added a flat wooden piece to the top so that it could hold a large candle, and then I painted the whole thing in a faux iron look.
This was a 2 step process. First I painted the whole thing in flat black spray paint.
Then I gave it a light misting of dark bronze metallic spray paint. The mist technique is spraying very lightly, from far away, and just a quick few passes. You don't want full coverage, you want the base color to show through.
This detail shows the textured, wrought iron effect you can get with a light mist of bronze metallic over a dark matte base.
I did not like the paint job, it was a weird mix of antique gold and a strange silvery bluish color.
I added a flat wooden piece to the top so that it could hold a large candle, and then I painted the whole thing in a faux iron look.
This was a 2 step process. First I painted the whole thing in flat black spray paint.
Then I gave it a light misting of dark bronze metallic spray paint. The mist technique is spraying very lightly, from far away, and just a quick few passes. You don't want full coverage, you want the base color to show through.
This detail shows the textured, wrought iron effect you can get with a light mist of bronze metallic over a dark matte base.
Wednesday, March 8, 2017
What I'm making- furniture.
Last week on garbage pick up day, I found this little wrought iron table on the curb. It was dirty and rusty and the glass top was missing. It had probably been used outdoors, so the rain had caused some damage.
But I liked the shape and thought it could be a good project.
I used a wire brush to clean off the rust and sanded the rusty spots to get them as smooth as possible, but they didn't get perfectly smooth.
Then I primed the whole piece with a white stain blocking primer spray paint. Then I went to go get some spray paint for the finish coat. I had planned to maybe do an off white paint with clear acrylic top. I went first to TAP Plastics to look at their remnant pieces of acrylic. I found a piece big enough but it was a smoked glass color. So that changed my whole plan for the paint color- now I was looking for a paint that would go well with the smoked acrylic. OI hoped to find something in a dark pewter metallic- darker than silver, but still cool toned. I did not find anything like that at Orchard Supply Hardware, but they did have a cool hammered look spray paint in dark bronze. I figured the hammered look would help camouflage the uneven texture from the rusty spots.
Here is the finished table, I really like how the dark bronze goes with the smoke color top. You can click the photo to zoom in.
But I liked the shape and thought it could be a good project.
I used a wire brush to clean off the rust and sanded the rusty spots to get them as smooth as possible, but they didn't get perfectly smooth.
Then I primed the whole piece with a white stain blocking primer spray paint. Then I went to go get some spray paint for the finish coat. I had planned to maybe do an off white paint with clear acrylic top. I went first to TAP Plastics to look at their remnant pieces of acrylic. I found a piece big enough but it was a smoked glass color. So that changed my whole plan for the paint color- now I was looking for a paint that would go well with the smoked acrylic. OI hoped to find something in a dark pewter metallic- darker than silver, but still cool toned. I did not find anything like that at Orchard Supply Hardware, but they did have a cool hammered look spray paint in dark bronze. I figured the hammered look would help camouflage the uneven texture from the rusty spots.
Here is the finished table, I really like how the dark bronze goes with the smoke color top. You can click the photo to zoom in.
Tuesday, February 21, 2017
I tried depotting eyeshadows
The last year or two, there has been a trend of people depotting their makeup from the palettes or packaging it came in, and putting them into Z palettes.
These are empty magnetic palettes that you can customize them, so for example if you love some colors in a large palette and hate others, you can get rid of the ones you never use and make your own palette with just your favorites. It's also a good way to save storage space. I decided to give it a try, but the 20$ Z-pallette is a big Nope for me! That is just for the EMPTY box with no makeup in it! I figured I could DIY something for free.
I used an old metal tin from an AOL cd. Remember those? AOL used to send out their stupid installation Cds all the time in the early 2000's, , sometimes just in a cardboard sleeve, but sometimes they came in a metal tin.
It must be around 15 years old, but that is how I am, I kind of hoard random things for craft supplies thinking I will eventually use it for something. And I did use it! I spray painted it to cover up the AOL logo. And it is nice and thin, just perfect for a makeup palette. The metal is steel, so magnets stick to it.
So far my cost is 0$.
Next I had to depot the eyeshadows from their original packaging. I watched some youtube videos that involved using heat to soften the glue, but I skipped that and just pried them out with brute force and a ceramics tool that is similar to a dental tool.
Now there are two ways to make the eyeshadows stick in the palette. You can either have a magnetic layer in the bottom of the palette, and the eyeshadow pans will stick IF they are a ferrous metal. Some of mine were not ferrous. The other option is to glue little magnets to the bottom of the shadow pans, and they will all stick to the steel tin. I decided to use this method since some of my pans were non-ferrous metal.
You can buy the magnets to stick to the back, but you know I wanted to do this for free, so I just found some old magnetic business cards that were stuck to the side of my fridge, and I cut them up into little squares and glued them on the back of the eyeshadow pans. One of the magnets was for Webvan, which was an old online grocery deliver company that went out of business in 2001. LOL Did I mention that I save craft supplies FOREVER? But I do eventually find a use for them so don't tell me to purge my treasure trove. I just saved $20!
My end result is here:
In this one tin, I have 6 Colour Pop singles, a Physicians Formula Quad (the rectangles), 2 L'oreal duos (the half circles), and a Stila "Dare to Bare" palette which contained 6 eyeshadows plus a highlight and bronzer.. (I don't use bronzer so I just use it as eyeshadow). I was able to condense 5 separate packages into this one tin.
I can also take out just a few of the colors at a time and put them in an empty Altoids tin if I want to take them in my purse or for travel.
These are empty magnetic palettes that you can customize them, so for example if you love some colors in a large palette and hate others, you can get rid of the ones you never use and make your own palette with just your favorites. It's also a good way to save storage space. I decided to give it a try, but the 20$ Z-pallette is a big Nope for me! That is just for the EMPTY box with no makeup in it! I figured I could DIY something for free.
I used an old metal tin from an AOL cd. Remember those? AOL used to send out their stupid installation Cds all the time in the early 2000's, , sometimes just in a cardboard sleeve, but sometimes they came in a metal tin.
It must be around 15 years old, but that is how I am, I kind of hoard random things for craft supplies thinking I will eventually use it for something. And I did use it! I spray painted it to cover up the AOL logo. And it is nice and thin, just perfect for a makeup palette. The metal is steel, so magnets stick to it.
So far my cost is 0$.
Next I had to depot the eyeshadows from their original packaging. I watched some youtube videos that involved using heat to soften the glue, but I skipped that and just pried them out with brute force and a ceramics tool that is similar to a dental tool.
Now there are two ways to make the eyeshadows stick in the palette. You can either have a magnetic layer in the bottom of the palette, and the eyeshadow pans will stick IF they are a ferrous metal. Some of mine were not ferrous. The other option is to glue little magnets to the bottom of the shadow pans, and they will all stick to the steel tin. I decided to use this method since some of my pans were non-ferrous metal.
You can buy the magnets to stick to the back, but you know I wanted to do this for free, so I just found some old magnetic business cards that were stuck to the side of my fridge, and I cut them up into little squares and glued them on the back of the eyeshadow pans. One of the magnets was for Webvan, which was an old online grocery deliver company that went out of business in 2001. LOL Did I mention that I save craft supplies FOREVER? But I do eventually find a use for them so don't tell me to purge my treasure trove. I just saved $20!
My end result is here:
In this one tin, I have 6 Colour Pop singles, a Physicians Formula Quad (the rectangles), 2 L'oreal duos (the half circles), and a Stila "Dare to Bare" palette which contained 6 eyeshadows plus a highlight and bronzer.. (I don't use bronzer so I just use it as eyeshadow). I was able to condense 5 separate packages into this one tin.
I can also take out just a few of the colors at a time and put them in an empty Altoids tin if I want to take them in my purse or for travel.
Saturday, May 28, 2011
My Swap-O-Rama-Rama dress
Last weekend I went to the Maker Faire and there was a big tent for Swap-O-Rama-Rama. Swap-O-Rama is a concept where you bring old clothes to donate and you can swap it for other people's cold clothes. But this was more than a simple clothing swap- the extra "rama" means you could also use the clothes to make new stuff. It's a swap-and-upcycle DIY kind of thing. They had sewing machines all set up for people to use and designers to help you with your ideas.
I brought in 2 zipper hoodie sweatshirts and 2 long sleeved v-neck tops.
I kept one of the v-neck tops to make into a dress. I just knew I wanted to make a skirt for it but I didn't know what kinds of fabric I'd find, so it was going to be a spontaneous project.
This is the finished dress.

The top is the black v-neck shirt I brought in.
The skirt is a charcoal grey knit skirt I found there, I was able to just cut off the waistband and sew it to my top. That made a very simple dress but I wanted more "oomph".
I found a shirt with a rayon print fabric I liked. I cut strips from it to make a ruffle for the bottom of the skirt.

I finished the bottom hem of the ruffle with the serger they had there. It was threaded with turquoise thread, which didn't really go with my project at all but it takes forever to rethread a serger so I just went with the serendipity of the moment! I think the turquoise actually adds an unexpected visual punch.
Then I found a really TEENSY miniskirt, like size XS, in the cutest black and pink chiffon print. It was lined in plain black chiffon. It had a handkerchief hem which I decided would look cute as a 2-layer ruffle on the 3/4 sleeves. It would break up the solid black and grey a little more, and make the dress less severe and Amish-y. The sleeves remind me of a Stevie Nicks kind of vibe.

For the last touch, I added a drawstring waist to make it less sack-like. I recycled the belt from the grey knit skirt, and just sewed a casing to the waist seam where I had attached the top and the skirt.

I am a bit bigger than my dress form so the dress is not as loose and drapey on me as you see here, but it's not skin tight either.

But I think this might be a dress I would actually wear, for fall & winter. It's enough black that it's well within my comfort zone, but it's got some more feminine touches to break it up and not look boring. I like the mid-calf length, especially with boots in the fall.
I like how my dress came out!
I could have done something similar with clothes I already had, or with goodwill finds, and I have done that in the past. But the Swap-O-Rama-Rama was a fun experience and I got to get rid of 2 big bulky hoodies which hopefully someone else made into something cool! I noticed they were both gone from the donation tables when I left so I hope someone got some good use out of them. (or maybe someone just wore them home, because it was rather unexpectedly chilly and windy that evening!)
I brought in 2 zipper hoodie sweatshirts and 2 long sleeved v-neck tops.
I kept one of the v-neck tops to make into a dress. I just knew I wanted to make a skirt for it but I didn't know what kinds of fabric I'd find, so it was going to be a spontaneous project.
This is the finished dress.
The top is the black v-neck shirt I brought in.
The skirt is a charcoal grey knit skirt I found there, I was able to just cut off the waistband and sew it to my top. That made a very simple dress but I wanted more "oomph".
I found a shirt with a rayon print fabric I liked. I cut strips from it to make a ruffle for the bottom of the skirt.
I finished the bottom hem of the ruffle with the serger they had there. It was threaded with turquoise thread, which didn't really go with my project at all but it takes forever to rethread a serger so I just went with the serendipity of the moment! I think the turquoise actually adds an unexpected visual punch.
Then I found a really TEENSY miniskirt, like size XS, in the cutest black and pink chiffon print. It was lined in plain black chiffon. It had a handkerchief hem which I decided would look cute as a 2-layer ruffle on the 3/4 sleeves. It would break up the solid black and grey a little more, and make the dress less severe and Amish-y. The sleeves remind me of a Stevie Nicks kind of vibe.
For the last touch, I added a drawstring waist to make it less sack-like. I recycled the belt from the grey knit skirt, and just sewed a casing to the waist seam where I had attached the top and the skirt.
I am a bit bigger than my dress form so the dress is not as loose and drapey on me as you see here, but it's not skin tight either.
But I think this might be a dress I would actually wear, for fall & winter. It's enough black that it's well within my comfort zone, but it's got some more feminine touches to break it up and not look boring. I like the mid-calf length, especially with boots in the fall.
I like how my dress came out!
I could have done something similar with clothes I already had, or with goodwill finds, and I have done that in the past. But the Swap-O-Rama-Rama was a fun experience and I got to get rid of 2 big bulky hoodies which hopefully someone else made into something cool! I noticed they were both gone from the donation tables when I left so I hope someone got some good use out of them. (or maybe someone just wore them home, because it was rather unexpectedly chilly and windy that evening!)
Tuesday, May 24, 2011
Scarf made from self-striping yarn
I finished knitting the scarf made from my hand-dyed self-striping yarn. This is the Dolcetto yarn that was supposed to be purple and black, but came out purple and dark brownish-purple. It's still pretty cool, it's not the colors I was trying for but luckily it is still colors I like.
I really liked the process of dying the yarn and then knitting it to see how it would come out in the final garment, so I have continued with the experimenting. Today I dyed some yarn with food coloring and it will be self-striping with yellow and green stripes. Pictures coming soon, as soon as it is dry.
Saturday, May 14, 2011
Yarn Dyeing Project
Today I finally finished my yarn dyeing project.
I started with two types of yarn.
1. Nature's Choice Organic Cotton yarn, in "Almond". This was basically off-white, an unbleached natural color.
2. Sensations Dolcetto (a very soft blend of wool and cotton), in a Lavender color.

What attracted me to these yarns was their very soft texture. I have really sensitive skin, and many yarns are too scratchy to wear directly touching my skin. My neck and face are especially sensitive and sometimes have eczema in winter, so my scarves and hats have to be very soft.
(most wools, for example, are not soft enough, but the Dolcetto blend of lambswool and cotton is exceptionally soft).
The unfortunate thing is that both of these yarns only came in a very limited selection of light colors, and I prefer deeper colors. But, I decided that I would experiment with dyeing since they were natural fibers.
I bought two colors of dye.
iDye in Purple
iDye in Black
This type of dye can be used on any natural fiber- both animal and plant.

My idea was to make a self-striping yarn with the Dolcetto. I wanted to make a scarf that would have alternating skinny stripes of lavender, purple and black.
My first step was to knit a few inches with the yarn in the gauge and width that I would use for the scarf. Then I unraveled it and measured how many inches of yarn was used per row.
Once I determined how long each color segment needed to be, I set up two kitchen chairs far apart in a room. I started winding the yarn around the two chair backs to make a large loop. I tied off my loop in the middle and then I planned to dip one side of the loop in purple, and the other side in black.
The plan for the off-white cotton yarn was simpler. I had two skeins of it, so I was going to dye one of them solid purple and the other one black. Then I would knit with them doubled up to make it chunkier and have both colors showing.
I started the dyeing process with the purple dye. I used both salt and vingar as a mordant, since one of my yarns was a blend of plant and animal fibers.
Generally you use salt as a mordant for plant fibers (cotton or linen), and you use vinegar as a mordant for animal fibers (wool or silk).
I used a large pot on the stovetop instead of the washing machine method. This allows you to use hotter water and the cleanup is easier. It's the recommended method for dark colors.
I put one of the skeins of cotton yarn into the pot, and suspended the Dolcetto yarn over the pot so that half of my large loops was submerged in the pot.
I also threw in a white cotton eyelet top that I got at the thrift store.
The results were very good!
The cotton yarn came out a deep, vibrant purple.
The Dolcetto also came out nice and dark.
The eyelet top came out more of a greyish-lavender, but it was very pretty.
Then I got busy and did not have time to do the black dyeing until the next month. I finally did that today and it was my final step in the project. (not counting the actual knitting!)
I followed the same process I used with the purple dye. Salt, vinger, large pot on stovetop.
I made sure to leave the yarn in the pot a long time since I wanted a nice deep black.
I decided at the last minute that I wanted to make the natural cottton yarn variegated black and grey, so I left half of it soaking for a long time, and just gave the other half a quick dip in the dye bath.
My results were puzzling, to say the least!
The black dye came out purple.
This is the off-white cotton yarn after dyeing it "black". It's not completely dry yet.

This was supposed to be black and grey, from a long soak and a short dip in the black dye.
Instead, it is dark purple and light purple.
Then I left the Dolcetto yarn soaking even longer, over an hour.
This is the result:

The top lavender section is the virgin yarn as it came.
The left side is the "black" dye, not completely dry yet.
The right side is the purple dye, completely dry.
You can see that the black is a different shade of purple, it's most reddish while the "purple" dye is more of a blue-violet.
But both of them are purple.
My purple and black stripes are going to be purple and purple stripes.
otherwise known as : PURPLE.
I also tried to tie-dye the cotton eyelet shirt in the black. I twisted it into a rope and then tied it up with rubber bands and twine. The idea was for it to be black with purple spiral designs.
That came out purple and purple, as well. No black, no grey. Just variegated purple.
It's still drying, I will take photos after it's dry and ironed.
So my conclusion at this stage is that they accidentally put purple dye into the black dye package. I don't think I did anything wrong, as far as mordants or soaking time.
If I had not soaked it long enough, then it should be grey, not purple.
If I didn't use the right mordants or not enough, then the colors should run and fade to grey.
But none of these mistakes would account for the black turning purple.
It also could not have leached purple dye from the previous dye job, because the yarn I was dyeing black was the "virgin" sections, and the eyelet top had been thoroughly rinsed and machine washed, it had no excess dye still in it.
So it's a good thing I like purple, I guess.
I might still try to re-do the black section on the Dolcetto with another brand of dye.
Update, May 15

this is dyed first with the purple dye and then black on top of it.
The areas at the bottom which were not tied up with rubber bands, and which the black could completely penetrate, are actually lighter than the areas that were tied up and kept from the black dye.

Hat knitted from yarn that I dyed.
Using 2 strands of yarn: One solid dark violet-purple, one variegated with dark and light burgundy-ish-purple.
100% organic cotton
I started with two types of yarn.
1. Nature's Choice Organic Cotton yarn, in "Almond". This was basically off-white, an unbleached natural color.
2. Sensations Dolcetto (a very soft blend of wool and cotton), in a Lavender color.
What attracted me to these yarns was their very soft texture. I have really sensitive skin, and many yarns are too scratchy to wear directly touching my skin. My neck and face are especially sensitive and sometimes have eczema in winter, so my scarves and hats have to be very soft.
(most wools, for example, are not soft enough, but the Dolcetto blend of lambswool and cotton is exceptionally soft).
The unfortunate thing is that both of these yarns only came in a very limited selection of light colors, and I prefer deeper colors. But, I decided that I would experiment with dyeing since they were natural fibers.
I bought two colors of dye.
iDye in Purple
iDye in Black
This type of dye can be used on any natural fiber- both animal and plant.
My idea was to make a self-striping yarn with the Dolcetto. I wanted to make a scarf that would have alternating skinny stripes of lavender, purple and black.
My first step was to knit a few inches with the yarn in the gauge and width that I would use for the scarf. Then I unraveled it and measured how many inches of yarn was used per row.
Once I determined how long each color segment needed to be, I set up two kitchen chairs far apart in a room. I started winding the yarn around the two chair backs to make a large loop. I tied off my loop in the middle and then I planned to dip one side of the loop in purple, and the other side in black.
The plan for the off-white cotton yarn was simpler. I had two skeins of it, so I was going to dye one of them solid purple and the other one black. Then I would knit with them doubled up to make it chunkier and have both colors showing.
I started the dyeing process with the purple dye. I used both salt and vingar as a mordant, since one of my yarns was a blend of plant and animal fibers.
Generally you use salt as a mordant for plant fibers (cotton or linen), and you use vinegar as a mordant for animal fibers (wool or silk).
I used a large pot on the stovetop instead of the washing machine method. This allows you to use hotter water and the cleanup is easier. It's the recommended method for dark colors.
I put one of the skeins of cotton yarn into the pot, and suspended the Dolcetto yarn over the pot so that half of my large loops was submerged in the pot.
I also threw in a white cotton eyelet top that I got at the thrift store.
The results were very good!
The cotton yarn came out a deep, vibrant purple.
The Dolcetto also came out nice and dark.
The eyelet top came out more of a greyish-lavender, but it was very pretty.
Then I got busy and did not have time to do the black dyeing until the next month. I finally did that today and it was my final step in the project. (not counting the actual knitting!)
I followed the same process I used with the purple dye. Salt, vinger, large pot on stovetop.
I made sure to leave the yarn in the pot a long time since I wanted a nice deep black.
I decided at the last minute that I wanted to make the natural cottton yarn variegated black and grey, so I left half of it soaking for a long time, and just gave the other half a quick dip in the dye bath.
My results were puzzling, to say the least!
The black dye came out purple.
This is the off-white cotton yarn after dyeing it "black". It's not completely dry yet.
This was supposed to be black and grey, from a long soak and a short dip in the black dye.
Instead, it is dark purple and light purple.
Then I left the Dolcetto yarn soaking even longer, over an hour.
This is the result:
The top lavender section is the virgin yarn as it came.
The left side is the "black" dye, not completely dry yet.
The right side is the purple dye, completely dry.
You can see that the black is a different shade of purple, it's most reddish while the "purple" dye is more of a blue-violet.
But both of them are purple.
My purple and black stripes are going to be purple and purple stripes.
otherwise known as : PURPLE.
I also tried to tie-dye the cotton eyelet shirt in the black. I twisted it into a rope and then tied it up with rubber bands and twine. The idea was for it to be black with purple spiral designs.
That came out purple and purple, as well. No black, no grey. Just variegated purple.
It's still drying, I will take photos after it's dry and ironed.
So my conclusion at this stage is that they accidentally put purple dye into the black dye package. I don't think I did anything wrong, as far as mordants or soaking time.
If I had not soaked it long enough, then it should be grey, not purple.
If I didn't use the right mordants or not enough, then the colors should run and fade to grey.
But none of these mistakes would account for the black turning purple.
It also could not have leached purple dye from the previous dye job, because the yarn I was dyeing black was the "virgin" sections, and the eyelet top had been thoroughly rinsed and machine washed, it had no excess dye still in it.
So it's a good thing I like purple, I guess.
I might still try to re-do the black section on the Dolcetto with another brand of dye.
Update, May 15
this is dyed first with the purple dye and then black on top of it.
The areas at the bottom which were not tied up with rubber bands, and which the black could completely penetrate, are actually lighter than the areas that were tied up and kept from the black dye.
Hat knitted from yarn that I dyed.
Using 2 strands of yarn: One solid dark violet-purple, one variegated with dark and light burgundy-ish-purple.
100% organic cotton
Saturday, July 18, 2009
Knitted Eyeball
I originally posted this tutorial on Instructables.com on Jan 31, 2009
Intro: This is a fun, easy knitting project using the Knifty Knitter knitting looms. Knitted eyeballs of different sizes make great Halloween decorations. Make a whole set in different eye colors, to match all your family members!
This project is suitable for older children, too, as long as they are old enough to use a (fairly dull) plastic yarn needle.


1. Knifty Knitter set of knitting looms.
These come in 4 sizes, for this project I am using the smallest loom (the blue one) but you can use any size. I have made larger eyeballs using the green loom.
2. Yarn- I am using Lion Brand Vanna's Choice. If you are using one of the larger looms you will want to either use thicker yarn (bulky weight) or use a double strand of worsted weight.
1 skein of white yarn
1 skein of black yarn (you won't use very much black so if you have some leftover from another project that is perfect)
1 skein of blue yarn (or brown or green, whatever eye color you want to make)
1 small skein of red yarn or red embroidery floss, I used Sugar 'n' Cream crochet yarn.
3. scissors
4. Poly fiberfill stuffing

The knitting process follows the basic Knifty Knitter instructions, I'm assuming if you own the looms you have used them before and know the basics.
Cast on with the white yarn and begin to knit a tube.

Knit until the white tube is about 5 inches* long.

*5 inch measurement pertains to using the smallest loom. If you are using a larger size loom, these length measurements will be larger.

(or brown or green, whatever eye color you chose)
Leave a tail of the white thread anchored to the outside peg, and wrap the next circle of loops using the blue yarn.
Continue knitting with the blue yarn a few more times around, and then tie off the tails of blue and white in a knot together. Pull the tails of the knot inside the tube to weave in later.

Intro: This is a fun, easy knitting project using the Knifty Knitter knitting looms. Knitted eyeballs of different sizes make great Halloween decorations. Make a whole set in different eye colors, to match all your family members!
This project is suitable for older children, too, as long as they are old enough to use a (fairly dull) plastic yarn needle.

step 1Materials
The Materials you will need to make this project:1. Knifty Knitter set of knitting looms.
These come in 4 sizes, for this project I am using the smallest loom (the blue one) but you can use any size. I have made larger eyeballs using the green loom.
2. Yarn- I am using Lion Brand Vanna's Choice. If you are using one of the larger looms you will want to either use thicker yarn (bulky weight) or use a double strand of worsted weight.
1 skein of white yarn
1 skein of black yarn (you won't use very much black so if you have some leftover from another project that is perfect)
1 skein of blue yarn (or brown or green, whatever eye color you want to make)
1 small skein of red yarn or red embroidery floss, I used Sugar 'n' Cream crochet yarn.
3. scissors
4. Poly fiberfill stuffing
step 2Getting started
You will start with the white yarn.The knitting process follows the basic Knifty Knitter instructions, I'm assuming if you own the looms you have used them before and know the basics.
Cast on with the white yarn and begin to knit a tube.
Knit until the white tube is about 5 inches* long.
*5 inch measurement pertains to using the smallest loom. If you are using a larger size loom, these length measurements will be larger.
step 3Changing colors
Now you want to switch to the blue yarn.(or brown or green, whatever eye color you chose)
Leave a tail of the white thread anchored to the outside peg, and wrap the next circle of loops using the blue yarn.
Continue knitting with the blue yarn a few more times around, and then tie off the tails of blue and white in a knot together. Pull the tails of the knot inside the tube to weave in later.
step 4Knitting the pupil
Knit about an inch and a half* of the blue yarn, then change colors to black.
Follow the same color changing directions as in step 3.
Now knit about an inch and a half with the black yarn.
When you are done, anchor the tail to the outside peg and cut the yarn leaving about a 6 inch tail.


Thread the piece of black yarn in the plastic yarn needle that came with your Knifty Knitter loom.
Use the yarn needle to lift the last set of loops off the loom, one by one, following the basic Knifty Knitter directions.
This piece of yarn will serve as a drawstring to close the pupil, once the eyeball is off the loom.

It looks long and skinny but don't worry, the tube will stretch quite a bit when it is stuffed.
Turn the tube inside out, and pull the last black piece of yarn tight from booth sides like a drawstring, closing off the black end. Tie them in a tight knot and also tie those 2 tails to the black tail from the tube.
Weave in the ends of these tails and the tails from both times you changed colors.
Turn the tube right side out again.


Use white poly fiberfill stuffing, it will still be somewhat visible through the holes in the knitted tube, but it won't fall out.
It won't be as visible through the blue and black sections because they are not stretched as much.
A tip from myrrhmaid on Instructables: use a length of pantyhose as a liner to keep the stuffing from coming out. Great tip!
Stuff it until you get a nice rounded shape, it can even be a little oval shaped like a nearsighted eyeball.
When you think it is full enough, thread some of the white yarn with the plastic yarn needle and thread it through the bottom loops on the white end of the tube.
Close it tight and tie it off using the same drawstring method you used on the black end.
Weave in ends.

Cut some of the red yarn, about 24 inch pieces are easiest to handle.
Thread one of the pieces in the plastic yarn needle and start "embroidering" veins onto the eyeball. I just improvised this step, weaving the red yarn in & out, over & under until it looked good. When you reach a stopping point like the end f a vein, just tie off the yarn in a knot and cut off the excess.
This is really a creative license thing, you can make the veins as simple or as branched as you like. No two eyeballs are alike in real life, so no two knitted eyeballs will be alike either.
Follow the same color changing directions as in step 3.
Now knit about an inch and a half with the black yarn.
When you are done, anchor the tail to the outside peg and cut the yarn leaving about a 6 inch tail.
- Inch and a half measurement pertains to using the smallest loom. If you are using a larger size loom, these length measurements will be larger.
step 5Remove eyeball from the loom
Wrap a piece of black yarn around the outside of the loom to measure it, and cut a piece about 6 inches larger than the loom circumference.Thread the piece of black yarn in the plastic yarn needle that came with your Knifty Knitter loom.
Use the yarn needle to lift the last set of loops off the loom, one by one, following the basic Knifty Knitter directions.
This piece of yarn will serve as a drawstring to close the pupil, once the eyeball is off the loom.
step 6Tying the drawstring
Now your knitted tube should be off the loom and look something like this.It looks long and skinny but don't worry, the tube will stretch quite a bit when it is stuffed.
Turn the tube inside out, and pull the last black piece of yarn tight from booth sides like a drawstring, closing off the black end. Tie them in a tight knot and also tie those 2 tails to the black tail from the tube.
Weave in the ends of these tails and the tails from both times you changed colors.
Turn the tube right side out again.
step 7Stuff the eyeball
Start to stuff the eyeball through the white end, which will still be open.Use white poly fiberfill stuffing, it will still be somewhat visible through the holes in the knitted tube, but it won't fall out.
It won't be as visible through the blue and black sections because they are not stretched as much.
A tip from myrrhmaid on Instructables: use a length of pantyhose as a liner to keep the stuffing from coming out. Great tip!
Stuff it until you get a nice rounded shape, it can even be a little oval shaped like a nearsighted eyeball.
When you think it is full enough, thread some of the white yarn with the plastic yarn needle and thread it through the bottom loops on the white end of the tube.
Close it tight and tie it off using the same drawstring method you used on the black end.
Weave in ends.
step 8Add the bloodshot veins!
Now you could stop here, it's a perfectly nice little eyeball. Roly-poly and soft, all ready to be thrown at someone! But something is missing! To make a good Halloween decoration, you really need some veins.Cut some of the red yarn, about 24 inch pieces are easiest to handle.
Thread one of the pieces in the plastic yarn needle and start "embroidering" veins onto the eyeball. I just improvised this step, weaving the red yarn in & out, over & under until it looked good. When you reach a stopping point like the end f a vein, just tie off the yarn in a knot and cut off the excess.
This is really a creative license thing, you can make the veins as simple or as branched as you like. No two eyeballs are alike in real life, so no two knitted eyeballs will be alike either.
Friday, July 17, 2009
Tutorial: T-shirt hacking
edit July 25:
This tutorial was featured of Totally Tutorials Blog. They have lots of other great tutes so check it out!
---------------------------------------
This is a tutorial to take a big, boxy, unflattering T-shirt from Michael's craft store, like this one:
(click any photo to see it larger)

And reconstruct it into a cute, girly, puffed-sleeve babydoll Tee like this one:

Michael's T-shirts really don't look that great on a woman's body. They have some good points: they are inexpensive, and they come in a lot of nice colors, but that boxy crew-neck cut just doesn't thrill me. So I decided to see what I could do with the standard T-shirt to make it cuter.
This week my local Michael's had blank tees on sale for $2.50 each, for any size. I picked up this pretty lemon-lime color.
Materials needed:
1 t-shirt
some thin elastic (optional, if you want gathered sleeves like mine)
scissors
sewing machine, thread, etc.
For this project: Buy a tee that is 1 or 2 sizes larger than you would normally wear. I bought an XL. (unlike American Apparel, these XLs really are EXTRA large, I think they are mens sizing)
First I sketched out what I wanted to make. I designed a top with a flat piece on the shoulders and upper chest, called a yoke, and then a loose, gathered section on the body. The front yoke is curved because I think that's more flattering, and the back yoke is straight across.
I added puffed sleeves.
The only seams you will need to sew on this top are:
2 armhole seams
front yoke
back yoke
finishing the neckline.
The side seams, shoulder seams, and hems are already done for you.

Phase One: CUTTING
1. Cut off both sleeves from the t-shirt, following the armhole seam.

2. Trim off the armhole seam from the sleeves. Set the sleeves aside.

3. Cut the front layer ONLY into a curved shape, starting about halfway up the armhole.
DO NOT CUT THROUGH BOTH LAYERS.
Try to make your curve symmetrial, you can do half of it and then fold the shirt to mark your cutting line, to make sure the other side matches.

4. Cut the back layer straight across, at the same height as the highest points of the front layer. (the sides.)

5. Cutting the yoke.
First you want to trim the shoulders because the oversized boxy tee probably had the armhole seam halfway down your bicep. We want the new armhole seam to be right at the natural shoulder. Hold the yoke up to your body or use a well-fitting shirt to determine where to trim the shoulders. Discard the two shoulder trimmings.

6. Cutting the neckline.
I don't like crew neck tops, they aren't comfortable or flattering. I wanted a deeper scoop neck which I think is more feminine. Trim off the neck ribbing and set that aside, you will reuse it.
Cut the front layer ONLY of the yoke into a deeper U-neckline. The back layer should stay at the higher level.

7. Trim the bottom of the yoke: Trim the front yoke into a curved shape, and trim the back yoke straight across. Discard the excess you trimmed from the bottom of the yoke.

Here is the final yoke piece, all trimmed and opened flat. You can see the difference between the back yoke and front yoke shapes.

step 8. (no photo)
Take the neckline ribbing you set aside in step 6. Trim the ribbing from the rest of the scrap fabric and the tag. You just want to salvage about a 1 1/2 inch wide strip of ribbing. It will be like a long loop. Stretch it out by gently pulling on it. It should stretch quite a bit once all the seams are cut off.
Phase Two: SEWING
9.The first thing. you want to sew is to finish the neckline. It's easier to do this while the yoke is separate.
Pin the ribbing to the neckline of the yoke, pin it to the wrong side (inside) of the yoke.
It should be long enough to bind the neckline after you have stretched it.
Now sew the ribbing to the wrong side of the neckline. Do not stretch the neckline of the yoke as you sew, you should only stretch the ribbing as needed to fit the yoke.

This is the wrong side of the yoke, with the ribbing sewn on.
10. Now you will fold the ribbing over to the right side (outside) of the yoke neckline. Fold the ribbing to cover the seam allowances and encase all the raw edges. Pin and sew the ribbing down to the right side of the yoke. This is one of the most important parts to do neatly, especially the front neckline, since it is the closest to your face. Most people won't notice a funky sleeve but will notice a crooked neckline.


Here you can see the ribbing area in the back is finished, and the ribbing near the needle is folded over about to be sewn.

Here is the yoke, with the neckline ribbing finished.
11. Attaching the body to the yoke.
With pins, mark the center point of the front and back yoke, and the center points of the front and back body pieces.

12. Set your machine stitch length to a long basting stitch, and baste along the top edge of the front and back body pieces. Also baste just along the top half of both sleeve pieces. Leave your threads dangling and both ends.

13. Pin the front yoke to the front body piece, right sides together, matching centers and matching sides. Pull on the loose basting threads like a drawstring, to gather the front body piece to fit the yoke. Distribute the gathers to be fuller right over your boobs.

14. Now sew the front yoke seam.
If you have a serger, you can do this in one step. Sergers are the best for sewing with t-shirt knits.
I don't have a serger so I sewed a straight seam, then I trimmed the excess seam allowance, and then used a mock-overlock stitch to finish the edges.
Repeat this process with the back yoke and back body pieces. You can distribute the gathers evenly across the back. Pin and sew the back yoke to the back body.
Here is the top viewed inside-out, with the front and back yokes finished.
15. The next step is to add the sleeves, which you set aside in a previous step.
There is no left or right sleeve, they are identical.
Pin the sleeve to the armhole, right sides together. Match up the side seam of the body to the underarm seam of the sleeve, and match the shoulder seam of the body to the top shoulder crease of the sleeve.
Distribute any gathers to the top of the shoulder area.
Now sew the armhole seam as you have pinned it.
If you have a serger, you can do this in one step.
I don't have a serger so I sewed a straight seam, then trimmed the excess seam allowance, and then used a mock-overlock stitch to finish the edges.
Sew on both sleeves.

Here is the top with sleeves added. This is the front view.

Here is the top with sleeves added. This is the back view.
Now you could wear the shirt just like this, if you like straight loose sleeves.
But I wanted puffed sleeves so this last step is optional.
16. To make the sleeves puffed, I added elastic to the sleeve hem. You don't need to make a casing for the elastic, because the existing hem will become your casing.
Measure around your upper arm and subtract a couple of inches. Cut 2 pieces of narrow elastic to this length. You can use 1/8" wide elastic, or 1/4 " wide, whatever you have on hand that will fit in the sleeve hem. If the elastic is stiffer or less stretchy, then only subtract one inch from your arm measurement.

Cut two small holes on the inside layer of the sleeve hem, one hole on each side of the underarm seam. Do not cut all the way through both layers the hem to the outside, you want these holes to be invisible from the outside.
Do this for both sleeves.

Attach a safety pin to one of your elastics.

Poke the safety pin into one of the small holes you cut. Use the safety pin to thread the elastic through the casing, until you get to the other small hole. Pull the safety pin and elastic out the other hole.

Tie both ends of the elastic together in a secure knot. Trim the ends and tuck the knot into one of the holes.
If you used wider elastic you can also sew the 2 ends together for a smooth flat joint, because a knot may be too bulky.

Here is the finished puffed sleeve from the outside.
Design ideas:
You can screen print on the shirt or add other embellishments to the yoke area.
You can buy two shirts in different colors, and then swap the yokes. So you can make a top with a black yoke, and pink sleeves and body, and another top with a pink yoke, and black sleeves and body. Give one to your friend and you will be opposite-twins!
This tutorial was featured of Totally Tutorials Blog. They have lots of other great tutes so check it out!
---------------------------------------
This is a tutorial to take a big, boxy, unflattering T-shirt from Michael's craft store, like this one:
(click any photo to see it larger)

And reconstruct it into a cute, girly, puffed-sleeve babydoll Tee like this one:

Michael's T-shirts really don't look that great on a woman's body. They have some good points: they are inexpensive, and they come in a lot of nice colors, but that boxy crew-neck cut just doesn't thrill me. So I decided to see what I could do with the standard T-shirt to make it cuter.
This week my local Michael's had blank tees on sale for $2.50 each, for any size. I picked up this pretty lemon-lime color.
Materials needed:
1 t-shirt
some thin elastic (optional, if you want gathered sleeves like mine)
scissors
sewing machine, thread, etc.
For this project: Buy a tee that is 1 or 2 sizes larger than you would normally wear. I bought an XL. (unlike American Apparel, these XLs really are EXTRA large, I think they are mens sizing)
First I sketched out what I wanted to make. I designed a top with a flat piece on the shoulders and upper chest, called a yoke, and then a loose, gathered section on the body. The front yoke is curved because I think that's more flattering, and the back yoke is straight across.
I added puffed sleeves.
The only seams you will need to sew on this top are:
2 armhole seams
front yoke
back yoke
finishing the neckline.
The side seams, shoulder seams, and hems are already done for you.
Phase One: CUTTING
1. Cut off both sleeves from the t-shirt, following the armhole seam.

2. Trim off the armhole seam from the sleeves. Set the sleeves aside.

3. Cut the front layer ONLY into a curved shape, starting about halfway up the armhole.
DO NOT CUT THROUGH BOTH LAYERS.
Try to make your curve symmetrial, you can do half of it and then fold the shirt to mark your cutting line, to make sure the other side matches.

4. Cut the back layer straight across, at the same height as the highest points of the front layer. (the sides.)

5. Cutting the yoke.
First you want to trim the shoulders because the oversized boxy tee probably had the armhole seam halfway down your bicep. We want the new armhole seam to be right at the natural shoulder. Hold the yoke up to your body or use a well-fitting shirt to determine where to trim the shoulders. Discard the two shoulder trimmings.

6. Cutting the neckline.
I don't like crew neck tops, they aren't comfortable or flattering. I wanted a deeper scoop neck which I think is more feminine. Trim off the neck ribbing and set that aside, you will reuse it.
Cut the front layer ONLY of the yoke into a deeper U-neckline. The back layer should stay at the higher level.

7. Trim the bottom of the yoke: Trim the front yoke into a curved shape, and trim the back yoke straight across. Discard the excess you trimmed from the bottom of the yoke.

Here is the final yoke piece, all trimmed and opened flat. You can see the difference between the back yoke and front yoke shapes.

step 8. (no photo)
Take the neckline ribbing you set aside in step 6. Trim the ribbing from the rest of the scrap fabric and the tag. You just want to salvage about a 1 1/2 inch wide strip of ribbing. It will be like a long loop. Stretch it out by gently pulling on it. It should stretch quite a bit once all the seams are cut off.
Phase Two: SEWING
9.The first thing. you want to sew is to finish the neckline. It's easier to do this while the yoke is separate.
Pin the ribbing to the neckline of the yoke, pin it to the wrong side (inside) of the yoke.
It should be long enough to bind the neckline after you have stretched it.
Now sew the ribbing to the wrong side of the neckline. Do not stretch the neckline of the yoke as you sew, you should only stretch the ribbing as needed to fit the yoke.

This is the wrong side of the yoke, with the ribbing sewn on.
10. Now you will fold the ribbing over to the right side (outside) of the yoke neckline. Fold the ribbing to cover the seam allowances and encase all the raw edges. Pin and sew the ribbing down to the right side of the yoke. This is one of the most important parts to do neatly, especially the front neckline, since it is the closest to your face. Most people won't notice a funky sleeve but will notice a crooked neckline.


Here you can see the ribbing area in the back is finished, and the ribbing near the needle is folded over about to be sewn.

Here is the yoke, with the neckline ribbing finished.
11. Attaching the body to the yoke.
With pins, mark the center point of the front and back yoke, and the center points of the front and back body pieces.

12. Set your machine stitch length to a long basting stitch, and baste along the top edge of the front and back body pieces. Also baste just along the top half of both sleeve pieces. Leave your threads dangling and both ends.

13. Pin the front yoke to the front body piece, right sides together, matching centers and matching sides. Pull on the loose basting threads like a drawstring, to gather the front body piece to fit the yoke. Distribute the gathers to be fuller right over your boobs.

14. Now sew the front yoke seam.
If you have a serger, you can do this in one step. Sergers are the best for sewing with t-shirt knits.
I don't have a serger so I sewed a straight seam, then I trimmed the excess seam allowance, and then used a mock-overlock stitch to finish the edges.
Repeat this process with the back yoke and back body pieces. You can distribute the gathers evenly across the back. Pin and sew the back yoke to the back body.

Here is the top viewed inside-out, with the front and back yokes finished.
15. The next step is to add the sleeves, which you set aside in a previous step.
There is no left or right sleeve, they are identical.
Pin the sleeve to the armhole, right sides together. Match up the side seam of the body to the underarm seam of the sleeve, and match the shoulder seam of the body to the top shoulder crease of the sleeve.
Distribute any gathers to the top of the shoulder area.
Now sew the armhole seam as you have pinned it.
If you have a serger, you can do this in one step.
I don't have a serger so I sewed a straight seam, then trimmed the excess seam allowance, and then used a mock-overlock stitch to finish the edges.
Sew on both sleeves.

Here is the top with sleeves added. This is the front view.

Here is the top with sleeves added. This is the back view.
Now you could wear the shirt just like this, if you like straight loose sleeves.
But I wanted puffed sleeves so this last step is optional.
16. To make the sleeves puffed, I added elastic to the sleeve hem. You don't need to make a casing for the elastic, because the existing hem will become your casing.
Measure around your upper arm and subtract a couple of inches. Cut 2 pieces of narrow elastic to this length. You can use 1/8" wide elastic, or 1/4 " wide, whatever you have on hand that will fit in the sleeve hem. If the elastic is stiffer or less stretchy, then only subtract one inch from your arm measurement.

Cut two small holes on the inside layer of the sleeve hem, one hole on each side of the underarm seam. Do not cut all the way through both layers the hem to the outside, you want these holes to be invisible from the outside.
Do this for both sleeves.

Attach a safety pin to one of your elastics.

Poke the safety pin into one of the small holes you cut. Use the safety pin to thread the elastic through the casing, until you get to the other small hole. Pull the safety pin and elastic out the other hole.

Tie both ends of the elastic together in a secure knot. Trim the ends and tuck the knot into one of the holes.
If you used wider elastic you can also sew the 2 ends together for a smooth flat joint, because a knot may be too bulky.

Here is the finished puffed sleeve from the outside.
Design ideas:
You can screen print on the shirt or add other embellishments to the yoke area.
You can buy two shirts in different colors, and then swap the yokes. So you can make a top with a black yoke, and pink sleeves and body, and another top with a pink yoke, and black sleeves and body. Give one to your friend and you will be opposite-twins!
Subscribe to:
Posts (Atom)
