edit July 25:
This tutorial was featured of
Totally Tutorials Blog. They have lots of other great tutes so check it out!
---------------------------------------
This is a tutorial to take a big, boxy, unflattering T-shirt from Michael's craft store, like this one:
(click any photo to see it larger)

And reconstruct it into a cute, girly, puffed-sleeve babydoll Tee like this one:

Michael's T-shirts really don't look that great on a woman's body. They have some good points: they are inexpensive, and they come in a lot of nice colors, but that boxy crew-neck cut just doesn't thrill me. So I decided to see what I could do with the standard T-shirt to make it cuter.
This week my local Michael's had blank tees on sale for $2.50 each, for any size. I picked up this pretty lemon-lime color.
Materials needed:1 t-shirt
some thin elastic (optional, if you want gathered sleeves like mine)
scissors
sewing machine, thread, etc.
For this project: Buy a tee that is 1 or 2 sizes larger than you would normally wear. I bought an XL. (unlike American Apparel, these XLs really are EXTRA large, I think they are mens sizing)
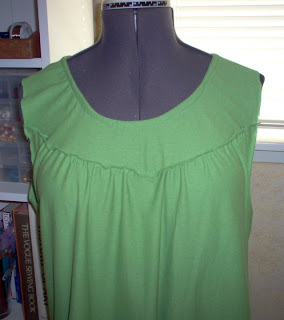
First I sketched out what I wanted to make. I designed a top with a flat piece on the shoulders and upper chest, called a yoke, and then a loose, gathered section on the body. The front yoke is curved because I think that's more flattering, and the back yoke is straight across.
I added puffed sleeves.
The only seams you will need to sew on this top are:
2 armhole seams
front yoke
back yoke
finishing the neckline.
The side seams, shoulder seams, and hems are already done for you.
 Phase One: CUTTING
1. Cut off both sleeves from the t-shirt, following the armhole seam.

2. Trim off the armhole seam from the sleeves. Set the sleeves aside.

3. Cut the front layer ONLY into a curved shape, starting about halfway up the armhole.
DO NOT CUT THROUGH BOTH LAYERS.
Try to make your curve symmetrial, you can do half of it and then fold the shirt to mark your cutting line, to make sure the other side matches.

4. Cut the back layer straight across, at the same height as the highest points of the front layer. (the sides.)

5. Cutting the yoke.
First you want to trim the shoulders because the oversized boxy tee probably had the armhole seam halfway down your bicep. We want the new armhole seam to be right at the natural shoulder. Hold the yoke up to your body or use a well-fitting shirt to determine where to trim the shoulders. Discard the two shoulder trimmings.

6. Cutting the neckline.
I don't like crew neck tops, they aren't comfortable or flattering. I wanted a deeper scoop neck which I think is more feminine. Trim off the neck ribbing and
set that aside, you will reuse it.Cut the front layer ONLY of the yoke into a deeper U-neckline. The back layer should stay at the higher level.

7. Trim the bottom of the yoke: Trim the front yoke into a curved shape, and trim the back yoke straight across. Discard the excess you trimmed from the bottom of the yoke.

Here is the final yoke piece, all trimmed and opened flat. You can see the difference between the back yoke and front yoke shapes.

step 8. (no photo)
Take the neckline ribbing you set aside in step 6. Trim the ribbing from the rest of the scrap fabric and the tag. You just want to salvage about a 1 1/2 inch wide strip of ribbing. It will be like a long loop. Stretch it out by gently pulling on it. It should stretch quite a bit once all the seams are cut off.
Phase Two: SEWING9.The first thing. you want to sew is to finish the neckline. It's easier to do this while the yoke is separate.
Pin the ribbing to the neckline of the yoke, pin it to the wrong side (inside) of the yoke.
It should be long enough to bind the neckline after you have stretched it.
Now sew the ribbing to the wrong side of the neckline. Do
not stretch the neckline of the yoke as you sew, you should only stretch the ribbing as needed to fit the yoke.

This is the wrong side of the yoke, with the ribbing sewn on.
10. Now you will fold the ribbing over to the right side (outside) of the yoke neckline. Fold the ribbing to cover the seam allowances and encase all the raw edges. Pin and sew the ribbing down to the right side of the yoke. This is one of the most important parts to do neatly, especially the front neckline, since it is the closest to your face. Most people won't notice a funky sleeve but will notice a crooked neckline.


Here you can see the ribbing area in the back is finished, and the ribbing near the needle is folded over about to be sewn.

Here is the yoke, with the neckline ribbing finished.
11. Attaching the body to the yoke.
With pins, mark the center point of the front and back yoke, and the center points of the front and back body pieces.

12. Set your machine stitch length to a long basting stitch, and baste along the top edge of the front and back body pieces. Also baste just along the top half of both sleeve pieces. Leave your threads dangling and both ends.

13. Pin the front yoke to the front body piece, right sides together, matching centers and matching sides. Pull on the loose basting threads like a drawstring, to gather the front body piece to fit the yoke. Distribute the gathers to be fuller right over your boobs.

14. Now sew the front yoke seam.
If you have a serger, you can do this in one step. Sergers are the best for sewing with t-shirt knits.
I don't have a serger so I sewed a straight seam, then I trimmed the excess seam allowance, and then used a mock-overlock stitch to finish the edges.
Repeat this process with the back yoke and back body pieces. You can distribute the gathers evenly across the back. Pin and sew the back yoke to the back body.
Here is the top viewed inside-out, with the front and back yokes finished.
15. The next step is to add the sleeves, which you set aside in a previous step.
There is no left or right sleeve, they are identical.
Pin the sleeve to the armhole, right sides together. Match up the side seam of the body to the underarm seam of the sleeve, and match the shoulder seam of the body to the top shoulder crease of the sleeve.
Distribute any gathers to the top of the shoulder area.
Now sew the armhole seam as you have pinned it.
If you have a serger, you can do this in one step.
I don't have a serger so I sewed a straight seam, then trimmed the excess seam allowance, and then used a mock-overlock stitch to finish the edges.
Sew on both sleeves.

Here is the top with sleeves added. This is the front view.

Here is the top with sleeves added. This is the back view.
Now you could wear the shirt just like this, if you like straight loose sleeves.
But I wanted puffed sleeves so this last step is optional.
16. To make the sleeves puffed, I added elastic to the sleeve hem. You don't need to make a casing for the elastic, because the existing hem will become your casing.
Measure around your upper arm and subtract a couple of inches. Cut 2 pieces of narrow elastic to this length. You can use 1/8" wide elastic, or 1/4 " wide, whatever you have on hand that will fit in the sleeve hem. If the elastic is stiffer or less stretchy, then only subtract one inch from your arm measurement.

Cut two small holes on the inside layer of the sleeve hem, one hole on each side of the underarm seam. Do not cut all the way through both layers the hem to the outside, you want these holes to be invisible from the outside.
Do this for both sleeves.

Attach a safety pin to one of your elastics.

Poke the safety pin into one of the small holes you cut. Use the safety pin to thread the elastic through the casing, until you get to the other small hole. Pull the safety pin and elastic out the other hole.

Tie both ends of the elastic together in a secure knot. Trim the ends and tuck the knot into one of the holes.
If you used wider elastic you can also sew the 2 ends together for a smooth flat joint, because a knot may be too bulky.

Here is the finished puffed sleeve from the outside.
Design ideas:
You can screen print on the shirt or add other embellishments to the yoke area.
You can buy two shirts in different colors, and then swap the yokes. So you can make a top with a black yoke, and pink sleeves and body, and another top with a pink yoke, and black sleeves and body. Give one to your friend and you will be opposite-twins!


