the javascript version
there is no way to remove my name at the bottom of this one, but it doesn't have the flashing popup box
Tuesday, November 17, 2009

etsy mini test 2
flash version with some code removed
I removed the extra links at the bottom and the "movie" parameter but it did not get rid of that flashing popup box.
I removed the extra links at the bottom and the "movie" parameter but it did not get rid of that flashing popup box.
| eek |
Monday, September 28, 2009
Milestones
Last week, I realized I had just missed my 3 year Etsyversary. I was looking in my shop for another reason on Monday, and I realized that the previous day was the date I joined Etsy . September 20, 2006.
Last year on my second Etsyversary, I made some special commemorative ACEO's and this year the whole thing just slipped my mind.
Then on Tuesday, a friend reminded me that the traditional gift for a 3rd anniversary is leather!
This was all the rationalization I needed to buy myself these fabulous vintage boots as an Etsyversary present!

Then I got looking at more and more vintage shoes and boots. Oh how I love fall weather (aka BOOT WEATHER) and how I love leather and SUEDE!
These are all shoes and boots on Etsy that I am currently lusting after. Click to see full size.

Item listings:
29988582, 31398666, 31160298, 31546116
28854817, 31480078, 31192839, 28266976
25026078, 31160332, 30633522, 30985709
I cannot really justify 12 new pairs of shoes, though. The two black pairs in the second row are to DIE for, but I currently have about 30 pairs of black shoes. What's a girl to do?? Post a comment and vote for your favorite pair.
Last week was also my mother's 80'th birthday! Now THAT'S a milestone!
I made her a lemon meringue pie instead of a birthday cake.

Last year on my second Etsyversary, I made some special commemorative ACEO's and this year the whole thing just slipped my mind.
Then on Tuesday, a friend reminded me that the traditional gift for a 3rd anniversary is leather!
This was all the rationalization I needed to buy myself these fabulous vintage boots as an Etsyversary present!
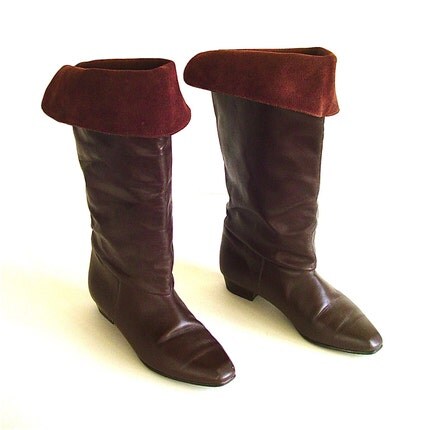
Then I got looking at more and more vintage shoes and boots. Oh how I love fall weather (aka BOOT WEATHER) and how I love leather and SUEDE!
These are all shoes and boots on Etsy that I am currently lusting after. Click to see full size.

Item listings:
29988582, 31398666, 31160298, 31546116
28854817, 31480078, 31192839, 28266976
25026078, 31160332, 30633522, 30985709
I cannot really justify 12 new pairs of shoes, though. The two black pairs in the second row are to DIE for, but I currently have about 30 pairs of black shoes. What's a girl to do?? Post a comment and vote for your favorite pair.
Last week was also my mother's 80'th birthday! Now THAT'S a milestone!
I made her a lemon meringue pie instead of a birthday cake.

Thursday, September 17, 2009
White chocolate, fruit & nut clusters
Today I had a craving for something sweet, so I made up a recipe for some candy just using ingredients I happened to have in my pantry.
I had a handful of almonds, about 1/4 of a bag of white chocolate chips, just leftovers from other baking adventures.
So I sort of threw in everything but the kitchen sink! They came out pretty tasty.

First I decided to candy the almonds, although you could use plain roasted nuts or even raw nuts. That's the beauty of this recipe, just use whatever you have on hand.
---------------------------------------------------------
Candied almonds INGREDIENTS:
1 cup whole raw almonds
1/2 cup granulated pure cane sugar
2 tablespoons butter
Combine nuts, sugar and butter in heavy skillet. I use a cast iron skillet. Do not use a teflon-coated pan. Some candy-makers believe that sugar melts better in a copper pot, but I've never cooked with copper pots!
Cook over medium heat, stirring constantly with wooden spoon, until nuts are toasted and sugar is golden brown and the consistency of a thick syrup. (about 15 minutes)Sugar should not be grainy.
If you want to test with a water glass, the syrup should be in the hard crack stage.
Remove from heat and stir in 1/2 teaspoon vanilla.
Spray a piece of aluminum foil with non-stick spray (like Pam).
Spread the nuts onto the foil in an even layer.
Let the candy cool, then break into 1 or 2 nut clusters.
BE CAREFUL AND USE OVEN MITTS, and wear long sleeves. This molten sugar syrup is HOT and sticky so if some gets on you it is like napalm. It will burn you and take some skin off with it when you peel it off.
---------------------------------------
Then I melted about 1/4 of a bag of white chocolate chips in the microwave, in a medium size pyrex bowl. I had a few pink candy melts left from Valentines day baking, so I threw them in there too, just to use them up. That's why the color is sort of off-whitish.
To melt chocolate, use a low power setting like 30%. Do it one or two minutes at a time, take out and stir, then nuke it another minute. (at low power)
repeat until the chocolate is melted.
Stir into the melted chocolate:
the chopped-up candied almonds
a couple handfuls of craisins (dried cranberries)
a handful of of Quaker Oatmeal Squares cereal (brown sugar flavor)
Stir it all together until everything is coated in chocolate.
Spread it out on a plate that you sprayed with Pam. (or rub some butter on the plate)
Put the plate in the fridge until the chocolate hardens.
Remove plate from fridge and chop up the candy into chunks.
Yummy!
You can use milk chocolate or dark chocolate instead of white.
You can use any kind of nuts.
You can use raisins, dried cherries, banana chips, any kind of dried fruit.
You can use almost any kinds of breakfast cereal, to add crunch.
This would be good with milk chocolate, peanuts, cheerios and banana chips.
Just look around your pantry for leftover stuff you can mix in!
I had a handful of almonds, about 1/4 of a bag of white chocolate chips, just leftovers from other baking adventures.
So I sort of threw in everything but the kitchen sink! They came out pretty tasty.

First I decided to candy the almonds, although you could use plain roasted nuts or even raw nuts. That's the beauty of this recipe, just use whatever you have on hand.
---------------------------------------------------------
Candied almonds INGREDIENTS:
1 cup whole raw almonds
1/2 cup granulated pure cane sugar
2 tablespoons butter
Combine nuts, sugar and butter in heavy skillet. I use a cast iron skillet. Do not use a teflon-coated pan. Some candy-makers believe that sugar melts better in a copper pot, but I've never cooked with copper pots!
Cook over medium heat, stirring constantly with wooden spoon, until nuts are toasted and sugar is golden brown and the consistency of a thick syrup. (about 15 minutes)Sugar should not be grainy.
If you want to test with a water glass, the syrup should be in the hard crack stage.
Remove from heat and stir in 1/2 teaspoon vanilla.
Spray a piece of aluminum foil with non-stick spray (like Pam).
Spread the nuts onto the foil in an even layer.
Let the candy cool, then break into 1 or 2 nut clusters.
BE CAREFUL AND USE OVEN MITTS, and wear long sleeves. This molten sugar syrup is HOT and sticky so if some gets on you it is like napalm. It will burn you and take some skin off with it when you peel it off.
---------------------------------------
Then I melted about 1/4 of a bag of white chocolate chips in the microwave, in a medium size pyrex bowl. I had a few pink candy melts left from Valentines day baking, so I threw them in there too, just to use them up. That's why the color is sort of off-whitish.
To melt chocolate, use a low power setting like 30%. Do it one or two minutes at a time, take out and stir, then nuke it another minute. (at low power)
repeat until the chocolate is melted.
Stir into the melted chocolate:
the chopped-up candied almonds
a couple handfuls of craisins (dried cranberries)
a handful of of Quaker Oatmeal Squares cereal (brown sugar flavor)
Stir it all together until everything is coated in chocolate.
Spread it out on a plate that you sprayed with Pam. (or rub some butter on the plate)
Put the plate in the fridge until the chocolate hardens.
Remove plate from fridge and chop up the candy into chunks.
Yummy!
You can use milk chocolate or dark chocolate instead of white.
You can use any kind of nuts.
You can use raisins, dried cherries, banana chips, any kind of dried fruit.
You can use almost any kinds of breakfast cereal, to add crunch.
This would be good with milk chocolate, peanuts, cheerios and banana chips.
Just look around your pantry for leftover stuff you can mix in!
Thursday, August 6, 2009
WATERMELON GRANITE
Today was hot so tonight I made some Watermelon Granite.

Granite (pronounced Granita and sometimes spelled Granita) is an easy frozen treat you can make without an ice cream maker!
I have also made this in lemon and in red wine flavors.
WATERMELON GRANITE
5 cups peeled and seeded watermelon chunks (from about a 3-pound slice of watermelon)
½ cup sugar (or sugar to taste depending on how sweet the melon is)
Juice of one lemon or lime
Place the watermelon chunks in a blender or food processor and blend on high speed until very smooth.
Strain the watermelon puree in a mesh strainer, Push on the pulp with the back of a large spoon to squeeze out all the juice.
discard pulp.
Transfer the watermelon juice to a mixing bowl and add the sugar and lemon/lime juice. Stir until the sugar is completely dissolved. Not all watermelons are the same sweetness so I don't really measure the sugar, I sweeten to taste. Note that sweetness gets weaker when it's frozen so you want to over-sweeten it a bit in the juice stage.
Pour the juice into a metal baking pan that will fit into your freezer. I use a 9"x9" square brownie pan. Put that on a freezer shelf for about 20 minutes.
Remove the pan from the freezer and use a fork to scrape any ice crystals from the sides of the bowl. Break up any solid chunks. Stir to incorporate the crystals. Return to the freezer.
Repeat the scraping procedure every 15-20 minutes, rake the fork through the pan to break up the crystals, then return the pan to the freezer.
Keep doing this until the consistency is fluffy and “snowy” when scraped with a fork or spoon, at least 4 hours.
Then scoop into bowls or dessert glasses and serve.
It's very good with a crisp nutty cookie such as these
http://chezlatina.com/I/chezlatina_1702_12056958.jpg
Granite (pronounced Granita and sometimes spelled Granita) is an easy frozen treat you can make without an ice cream maker!
I have also made this in lemon and in red wine flavors.
WATERMELON GRANITE
5 cups peeled and seeded watermelon chunks (from about a 3-pound slice of watermelon)
½ cup sugar (or sugar to taste depending on how sweet the melon is)
Juice of one lemon or lime
Place the watermelon chunks in a blender or food processor and blend on high speed until very smooth.
Strain the watermelon puree in a mesh strainer, Push on the pulp with the back of a large spoon to squeeze out all the juice.
discard pulp.
Transfer the watermelon juice to a mixing bowl and add the sugar and lemon/lime juice. Stir until the sugar is completely dissolved. Not all watermelons are the same sweetness so I don't really measure the sugar, I sweeten to taste. Note that sweetness gets weaker when it's frozen so you want to over-sweeten it a bit in the juice stage.
Pour the juice into a metal baking pan that will fit into your freezer. I use a 9"x9" square brownie pan. Put that on a freezer shelf for about 20 minutes.
Remove the pan from the freezer and use a fork to scrape any ice crystals from the sides of the bowl. Break up any solid chunks. Stir to incorporate the crystals. Return to the freezer.
Repeat the scraping procedure every 15-20 minutes, rake the fork through the pan to break up the crystals, then return the pan to the freezer.
Keep doing this until the consistency is fluffy and “snowy” when scraped with a fork or spoon, at least 4 hours.
Then scoop into bowls or dessert glasses and serve.
It's very good with a crisp nutty cookie such as these
http://chezlatina.com/I/chezlatina_1702_12056958.jpg
Saturday, July 18, 2009
Knitted Eyeball
I originally posted this tutorial on Instructables.com on Jan 31, 2009
Intro: This is a fun, easy knitting project using the Knifty Knitter knitting looms. Knitted eyeballs of different sizes make great Halloween decorations. Make a whole set in different eye colors, to match all your family members!
This project is suitable for older children, too, as long as they are old enough to use a (fairly dull) plastic yarn needle.


1. Knifty Knitter set of knitting looms.
These come in 4 sizes, for this project I am using the smallest loom (the blue one) but you can use any size. I have made larger eyeballs using the green loom.
2. Yarn- I am using Lion Brand Vanna's Choice. If you are using one of the larger looms you will want to either use thicker yarn (bulky weight) or use a double strand of worsted weight.
1 skein of white yarn
1 skein of black yarn (you won't use very much black so if you have some leftover from another project that is perfect)
1 skein of blue yarn (or brown or green, whatever eye color you want to make)
1 small skein of red yarn or red embroidery floss, I used Sugar 'n' Cream crochet yarn.
3. scissors
4. Poly fiberfill stuffing

The knitting process follows the basic Knifty Knitter instructions, I'm assuming if you own the looms you have used them before and know the basics.
Cast on with the white yarn and begin to knit a tube.

Knit until the white tube is about 5 inches* long.

*5 inch measurement pertains to using the smallest loom. If you are using a larger size loom, these length measurements will be larger.

(or brown or green, whatever eye color you chose)
Leave a tail of the white thread anchored to the outside peg, and wrap the next circle of loops using the blue yarn.
Continue knitting with the blue yarn a few more times around, and then tie off the tails of blue and white in a knot together. Pull the tails of the knot inside the tube to weave in later.


Intro: This is a fun, easy knitting project using the Knifty Knitter knitting looms. Knitted eyeballs of different sizes make great Halloween decorations. Make a whole set in different eye colors, to match all your family members!
This project is suitable for older children, too, as long as they are old enough to use a (fairly dull) plastic yarn needle.


step 1Materials
The Materials you will need to make this project:1. Knifty Knitter set of knitting looms.
These come in 4 sizes, for this project I am using the smallest loom (the blue one) but you can use any size. I have made larger eyeballs using the green loom.
2. Yarn- I am using Lion Brand Vanna's Choice. If you are using one of the larger looms you will want to either use thicker yarn (bulky weight) or use a double strand of worsted weight.
1 skein of white yarn
1 skein of black yarn (you won't use very much black so if you have some leftover from another project that is perfect)
1 skein of blue yarn (or brown or green, whatever eye color you want to make)
1 small skein of red yarn or red embroidery floss, I used Sugar 'n' Cream crochet yarn.
3. scissors
4. Poly fiberfill stuffing

step 2Getting started
You will start with the white yarn.The knitting process follows the basic Knifty Knitter instructions, I'm assuming if you own the looms you have used them before and know the basics.
Cast on with the white yarn and begin to knit a tube.

Knit until the white tube is about 5 inches* long.

*5 inch measurement pertains to using the smallest loom. If you are using a larger size loom, these length measurements will be larger.

step 3Changing colors
Now you want to switch to the blue yarn.(or brown or green, whatever eye color you chose)
Leave a tail of the white thread anchored to the outside peg, and wrap the next circle of loops using the blue yarn.
Continue knitting with the blue yarn a few more times around, and then tie off the tails of blue and white in a knot together. Pull the tails of the knot inside the tube to weave in later.

step 4Knitting the pupil
Knit about an inch and a half* of the blue yarn, then change colors to black.
Follow the same color changing directions as in step 3.
Now knit about an inch and a half with the black yarn.
When you are done, anchor the tail to the outside peg and cut the yarn leaving about a 6 inch tail.


Thread the piece of black yarn in the plastic yarn needle that came with your Knifty Knitter loom.
Use the yarn needle to lift the last set of loops off the loom, one by one, following the basic Knifty Knitter directions.
This piece of yarn will serve as a drawstring to close the pupil, once the eyeball is off the loom.

It looks long and skinny but don't worry, the tube will stretch quite a bit when it is stuffed.
Turn the tube inside out, and pull the last black piece of yarn tight from booth sides like a drawstring, closing off the black end. Tie them in a tight knot and also tie those 2 tails to the black tail from the tube.
Weave in the ends of these tails and the tails from both times you changed colors.
Turn the tube right side out again.


Use white poly fiberfill stuffing, it will still be somewhat visible through the holes in the knitted tube, but it won't fall out.
It won't be as visible through the blue and black sections because they are not stretched as much.
A tip from myrrhmaid on Instructables: use a length of pantyhose as a liner to keep the stuffing from coming out. Great tip!
Stuff it until you get a nice rounded shape, it can even be a little oval shaped like a nearsighted eyeball.
When you think it is full enough, thread some of the white yarn with the plastic yarn needle and thread it through the bottom loops on the white end of the tube.
Close it tight and tie it off using the same drawstring method you used on the black end.
Weave in ends.

Cut some of the red yarn, about 24 inch pieces are easiest to handle.
Thread one of the pieces in the plastic yarn needle and start "embroidering" veins onto the eyeball. I just improvised this step, weaving the red yarn in & out, over & under until it looked good. When you reach a stopping point like the end f a vein, just tie off the yarn in a knot and cut off the excess.
This is really a creative license thing, you can make the veins as simple or as branched as you like. No two eyeballs are alike in real life, so no two knitted eyeballs will be alike either.
Follow the same color changing directions as in step 3.
Now knit about an inch and a half with the black yarn.
When you are done, anchor the tail to the outside peg and cut the yarn leaving about a 6 inch tail.
- Inch and a half measurement pertains to using the smallest loom. If you are using a larger size loom, these length measurements will be larger.


step 5Remove eyeball from the loom
Wrap a piece of black yarn around the outside of the loom to measure it, and cut a piece about 6 inches larger than the loom circumference.Thread the piece of black yarn in the plastic yarn needle that came with your Knifty Knitter loom.
Use the yarn needle to lift the last set of loops off the loom, one by one, following the basic Knifty Knitter directions.
This piece of yarn will serve as a drawstring to close the pupil, once the eyeball is off the loom.

step 6Tying the drawstring
Now your knitted tube should be off the loom and look something like this.It looks long and skinny but don't worry, the tube will stretch quite a bit when it is stuffed.
Turn the tube inside out, and pull the last black piece of yarn tight from booth sides like a drawstring, closing off the black end. Tie them in a tight knot and also tie those 2 tails to the black tail from the tube.
Weave in the ends of these tails and the tails from both times you changed colors.
Turn the tube right side out again.


step 7Stuff the eyeball
Start to stuff the eyeball through the white end, which will still be open.Use white poly fiberfill stuffing, it will still be somewhat visible through the holes in the knitted tube, but it won't fall out.
It won't be as visible through the blue and black sections because they are not stretched as much.
A tip from myrrhmaid on Instructables: use a length of pantyhose as a liner to keep the stuffing from coming out. Great tip!
Stuff it until you get a nice rounded shape, it can even be a little oval shaped like a nearsighted eyeball.
When you think it is full enough, thread some of the white yarn with the plastic yarn needle and thread it through the bottom loops on the white end of the tube.
Close it tight and tie it off using the same drawstring method you used on the black end.
Weave in ends.

step 8Add the bloodshot veins!
Now you could stop here, it's a perfectly nice little eyeball. Roly-poly and soft, all ready to be thrown at someone! But something is missing! To make a good Halloween decoration, you really need some veins.Cut some of the red yarn, about 24 inch pieces are easiest to handle.
Thread one of the pieces in the plastic yarn needle and start "embroidering" veins onto the eyeball. I just improvised this step, weaving the red yarn in & out, over & under until it looked good. When you reach a stopping point like the end f a vein, just tie off the yarn in a knot and cut off the excess.
This is really a creative license thing, you can make the veins as simple or as branched as you like. No two eyeballs are alike in real life, so no two knitted eyeballs will be alike either.

Subscribe to:
Posts (Atom)


