I was all set to write a plastic fusing tutorial because lots of people were asking me for one, but then Etsylabs published a tutorial on May 6! LOL
So I wrote mine anyway, but more as a complement or addition to theirs.
Here are some good tutorials for fusing plastic bags:
http://etsylabs.blogspot.com/2007/05/long-overdue-fusing-plastic-bag.html
http://blog.etsy.com/?p=239
http://modcottage.com/?p=109
http://www.inthewake.org/howtos/shopping-bag-plastic.html
My own tips and tricks I will add to the above:
This is all you need to start fusing:
1. an iron
2. a hard heat-resistant surface like a wooden cutting board
3. baking parchment paper. This works better than typing paper because it's silicon coated and nothing sticks to it. It's also larger, and semi-transparent so you can see appliqués have the correct placement, etc.
4. Some plastic bags! There's no shortage of those in the world, unfortunately.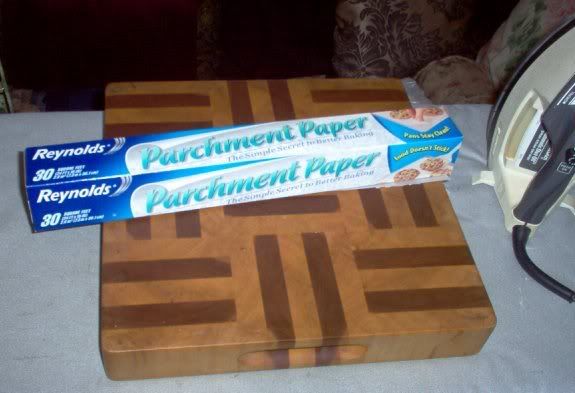
DO set the iron between polyester and rayon. One of the tutes says to set it at cotton, that is too hot in my opinion but perhaps irons vary.
DON'T use steam.
DO fuse both HDPE (recycle code 2) and LDPE (recycle code 4) bags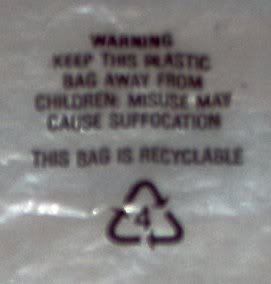
HDPE is the crinkly plastic grocery bags, LDPE is the glossy stretchy bags like Target bags, also clear bags like dry cleaner bags.
They will both fuse, to themselves and to eachother. You may need to lower the heat just a bit for LDPE.
There are some tutorials which say you cannot use LDPE, but I have successfully fused it.
The sides of this bag are Target bags (LDPE) and the inside layers are HDPE
and this entire bag is LDPE, I used the clear bags my newspaper is delivered in on rainy days
DO use all kinds of plastic, not just grocery bags. Use the bags from frozen veggies, use the bag from dried pasta, bread wrappers, etc. You can use potato chip bags inside out to get a silver metallic color. This works better for small appliqués than for a large piece, because foil-lined plastic will not shrink at the same rate as normal plastic, so if you try to fuse large areas of foil lined plastic you will get bubbles and puckers..
DO apply the heat a little longer for thicker plastic. You also don't need to use as many layers when you use a thicker plastic.
DO put a clear plastic layer over any vivid colored design you want to show on the outside of the bag. Red ink especially seems to melt and bleed. If you don't use the clear layer on top, the ink will transfer to your paper like this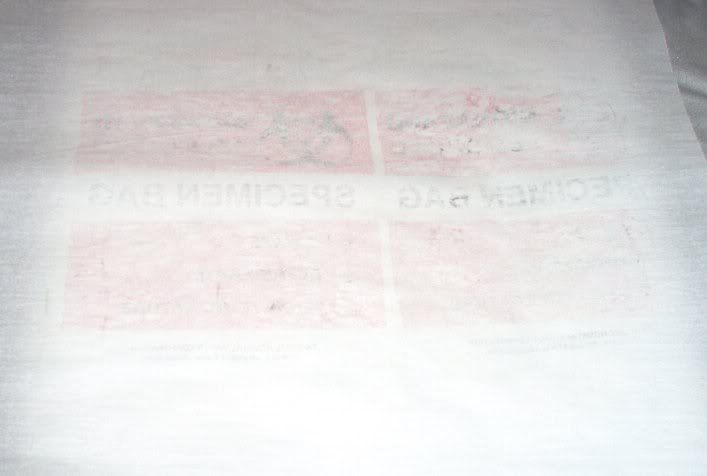
DO use a layer of clear plastic on top of appliqués too, to seal them in.
DO reuse the parchament paper over and over, unless it gets an ink transfer from a bag. Then you will need a clean piece, because it will transfer that ink back to your next fused piece.
DON'T use waxed paper instead of parchament paper! The wax will melt and make a stinky mess. Waxed paper cannot take the heat, freezer paper is also not ideal because it's made for use with cold not with heat. Baking parchament paper is the best because it's made to withstand heat up to 420 degrees Fahrenheit.
DO use a hard ironing surface such as a wooden cutting board. A hard, smooth surface will help you get even adhesion.
DO use firm pressure when ironing, but keep the iron moving. This isn't like fusible interfacing where you have to keep the iron in place for 10 or 15 seconds- f you do that the plastic will probably burn.
DO fuse one or two new layers at a time.
DON'T try to fuse all 8 layers at once, or the middle layers will have incomplete adhesion.
If you find your fused plastic curling up too much, flip it over and fuse the next layer onto the back. This will equalize the shrinkage and flatten it out.
DO sew the finished material in the sewing machine or serger.
DO use a longer stitch length, so you won't have too many holes forming a perforated line.(prone to tearing)
DO sew small items wrong sides together.
You DON'T need to turn the seams to the inside like you do with fabric items, because the plastic does not fray. Also, it may be difficult to turn smaller items like cosmetic pouches inside out.
To see some of my fused plastic finished projects, check out this Flickr set.
To see my fused plastic items for sale, check out my Etsy store. (more items coming soon)

10 comments:
This is a great tutorial. I may have to try it one day!
What a thorough treatment of the entire process. Thanks for the added tips about the waxed paper. It makes sense, but I believe I have read another tutorial somewhere along the line that suggested wax paper. Not a good idea.
You are so generous to share your "secrets". I agree, plastic shopping bags now liter the roadsides... like some type of strange flower, nice to find an alternate use for them.
There are some tutes which say to use waxed paper and I don't know if that is just a misunderstanding- someone might be thinking it's the same thing as parchament paper- or what. But logic tells you what happens when wax meets a hot iron! Melted, burning wax, smoke, stink, mess.
Parchament paper is ideal, it's nice and wide, it is made to withstand heat, and nothing sticks to it, not even melted sugar like peanut brittle.
Ok I have to know.. how is it that you have on one bag, Target AND Blokker bags???? I'm an American living in Holland so I recognize both. Are we soul mates? LOL I go to blokker all the time here in Holland! If you want more bags I can save them for you!
I'm American too but I got the Blokker bags on a visit to Holland last November. (2006) They had such cool Christmas decorations, lots of black&white themed ornaments which I don't usually see in the US. I think we are behind Europe by a few years in style so maybe the B&W trend for Christmas will hit the States this year or next.
I was back in Holland this past summer and went back to Blokker and there was nothing I wanted to buy. :-( I fell in love with it during Sinterklaas/Christmas, but their summer merchandise didn't excite me at all. I do still love the bags though, that orange & silver combination is so pretty. I love to save foreign bags from traveling to use for plastic fusing, I brought back so many bags from Europe this summer!
You will recognize Wibra and Etos here, I'm sure:
arrg it keeps cutting off my link, it won't let me post this as a clickable link so copy/paste
http://www.flickr.com/photos/eclipse_etc/sets/72157600088247939/
truly amazing!! I found your tutorial on Instructables and followed you here! It's funny because my boyfriend and I were just wondering about what we should do with the insane amount of plastic bags we have!
Thanks for all the dos and don'ts... more helpful than the etsy tutorial!!
Heather
Thanks a lot! How do you get the zippers in though? do you sew them in?
Yes, they are sewn in just like with a fabric bag, the only differences are:
1. use a longer stitch length
2. you don't need to overlock the raw edges since the plastic does not fray.
Post a Comment