Wednesday, December 16, 2009

2009 Holiday Baking Log

1. Thanksgiving: Chocolate Pecan Pie

Thanksgiving pies 2009
9 inch pie plate, buttered

Crust...
7-8oz shortbread (this is usually 1 package of shortbread cookies)
2-3 tablespoons melted butter

Pulse shortbread in food processor until finely crumbled. Use your hands to mix in melted butter until small clumps form, then press butter & shortbread mixture into buttered pie plate to create crust. If the crust seems a little too soft put it in the fridge or freezer for 10-15 minutes before adding the filling.


Pie Filling...
1.5 cups pecan halves or pieces, toasted
3 oz. coarsely chopped baking chocolate
3 large eggs
1/3 cup packed light brown sugar
1 teaspoon vanilla extract
1-2 tablespoon brandy
1/4 teaspoon salt
3/4 cup dark corn syrup

Mix all ingredients until combined. Pour pecan mixture into crust. Bake for 50-55 minutes at 350 degrees.

2. Thanksgiving: Pumpkin Pie

Thanksgiving pies 2009

INGREDIENTS
  • 3/4 cup granulated sugar
  • 1 teaspoon ground cinnamon
  • 1/2 teaspoon salt
  • 1/2 teaspoon ground ginger
  • 1/4 teaspoon ground cloves
  • 2 large eggs
  • 1 can (15 oz.) pumpkin. (unspiced, unsweetened, just plain pumpkin.)
  • 1 can (12 fl. oz.) Evaporated Milk
  • 1 unbaked 9-inch (4-cup volume) deep-dish pie shell

Directions

MIX sugar, cinnamon, salt, ginger and cloves in small bowl. Beat eggs in large bowl. Stir in pumpkin and sugar-spice mixture. Gradually stir in evaporated milk.

POUR into pie shell.

BAKE in preheated 425° F oven for 15 minutes. Reduce temperature to 350° F; bake for 40 to 50 minutes or until knife inserted near center comes out clean. Cool on wire rack for 2 hours. Serve immediately or refrigerate. Top with whipped cream before serving.

3. Banana-pecan bread

4. Cranberry bread

5. Apple-pecan bread

6. English shortbread, dipped in chocolate

English shortbread cookies

INGREDIENTS
2 1/2 cups all purpose flour (I prefer unbleached flour)
pinch of salt
1 cup unsalted butter, softened (NO margarine, no substitutions)
1 cup powdered sugar

Preheat oven to 325 F

Combine flour and salt in bowl and set aside.
Beat butter and sugar with electric mixer until light and fluffy.
At low speed, gradually add flour mixture, beating until blended.

Knead dough lightly on work surface.
Divide dough in half. Pat each half into a slightly flattened disc. (a squished ball)
Place one disc on a lightly floured board. Sprinkle lightly with flour and cover with a sheet of wax paper.
Roll with a rolling pin until dough is about 1/4 inch thick. Remove wax paper.
Cut into desired shapes with cookie cutters or knife.
I also used some cookie stamps- these are glass stamps that imprint a design into the cookie.
Do not re-roll the scraps- bake them in the irregular shape they are and eat as testers.
(re-rolling makes the cookies drier and tougher, less melt-in-your-mouth)
If you want to minimize waste*, cute shortbread into bars or fingers.
Lightly prick cookies all over with a fork. (you don't want to penetrate all the way, just a couple of millimeters)

Bake about 20 - 25 minutes at 325 F until cookies are lightly golden at the edges.
Cool completely on a wire rack.

To made the black & white cookies:
Melt candy making chocolate or chocolate chips at LOW temp in the microwave. Be careful not to burn it- only microwave it on 30% power for 30-60 seconds at a time, then stir.
When chocolate is melted, dip one half of each cookie into chocolate and lay on a buttered plate. Put the plate in the fridge for a few minutes to harden chocolate.

* it's really not "waste" because you will eat all the scraps too!

7. Rolled spice cookies

Rolled spice cookies

INGREDIENTS
1/2 cup shortening, I use Crisco sticks because it's so easy to measure
1/2 cup sugar
1 egg
....
1 1/4 cup flour
1 1/2 teaspoons baking powder (not soda)
1/4 teaspoon salt
1/2 teaspoon ground cinnamon
1/4 teaspoon ground nutmeg
1/8 teaspoon ground cloves

Cream together shortening and sugar until well mixed and fluffy.
mix in egg.
sift together all the dry ingredients, then add to shortening mixture.
mix until all dry ingredients are incorporated and dough holds together
wrap dough in waxed paper and chill at least 30 minutes.
Flour a smooth surface and flour your rolling pin. I use a rolling pin cover which is like a thin knitted sock, and a rolling cloth which is like thick cotton canvas. They make rolling a little easier but you don't need them, you just may have to use a little more flour.
Divide the dough in half and roll out half at a time, until it's about 1/8 inch thick.
Cut out shapes with your favorite cookie cutters and place on baking parchment-lined cookie sheet.
Spray lightly with Pam cooking spray, and Sprinkle with colored sugar. (the Pam makes the sugar stick better)
Bake on in a preheated 350 (F) oven for 10 minutes.
Cookies should be lightly brown at edges but not too dark.

8. Cuban Wedding Cakes aka Mexican wedding cookies

mexican wedding cookies

INGREDIENTS
2 cups flour
1 cup hazelnut meal *
1/2 cup powdered sugar
pinch of salt
1 teaspoon vanilla
1 cup butter, softened and cut into pieces
extra powdered sugar for coating

preheat oven to 325 (F)
Mix together the first 4 ingredients.
Stir in the vanilla.
With a pastry blender, cut in the butter.
Mix until dough looks line fine crumbs and holds together. All dry ingredients should be incorporated.
Knead dough with your hands a few times gently. Just squish it together to make sure all the dry stuff is mixed in.
Roll dough into 1-inch balls, and bake on ungreased cookie sheet at 325 (F) for 25 minutes. The lower temperature and slower baking time keeps the balls in their shape, so they don't spread out.
Cool 5 minutes, then roll cookies in powdered sugar. I use Snow White Non-melting Sugar because it won't dissolve or go invisible on a moist or oily cookie.
If you use regular powdered sugar and it does soak up the oil and melt, cool cookies completely and roll them in powdered sugar a second time.


* Nut meal is very finely chopped nuts. You may use hazelnut meal, almond meal, or pecan meal. You can also make your own by putting toasted unsalted nuts in a blender but be careful not to make nut butter.

9. Key Lime Pie

10. Dark chocolate spritz cookies
I made these extra dark, they are almost black. The black cocoa tastes like oreos.

dark chocolate spritz

INGREDIENTS
3/4 cup unsalted butter, softened (no margarine!)
1/2 cup granulated sugar
1 egg yolk
1 tsp. almond extract
1 1/2 cups all purpose flour
1/4 cup cocoa (I used black cocoa from king arthur flour but you can use regular cocoa)
optional: 2 Tblsp espresso powder from king arthur flour

Cream first 4 ingredients until light and fluffy.
Sift flour and cocoa together, then mix dry ingredients into the butter mixture.
This dough is versatile: you can shape it into balls, flattened balls, you can form it into a log, chill and slice. I chose to use my cookie gun because it makes pretty shapes.

Bake 7-9 minutes until set. The dough is dark so you cannot judge doneness by golden brownness. Push gently at the edge of a cookie, if it moves as a semi-solid unit rather than just making a dent, the cookie is done.
Cool, and then decorate if you wish.

11. Chocolate Rugelach

chocolate rugelach

Ingredients :
8 ounces cream cheese, room temp and cut into chunks
2 sticks (1 cup) butter, room temp and cut into chunks
2 teaspoons sugar
2 cups all-purpose flour
filling:
1 can Love'n Bake™ Chocolate "Schmear" Filling

Cream the butter and cream cheese and sugar.
sift in the flour and mix until dough can form a ball
pat the dough into a flattened round, wrap in plastic wrap and chill for 30 minutes.
preheat oven to 375 (F), and grease 2 cookie sheets

divide dough in half and roll out half of it on a floured surface into a circle about 11 inches in diameter.
place a large dinner plate on dough and trim around edges with a knife.
spread the chocolate "Schmear" Filling on the circle.
Cut the circle into quarters, and then cut each quarter into 4 pieces, to form 16 wedge shaped pieces.
Roll up a triangle starting from the wide end, and tuck the point under the cookie on the baking sheet.
Repeat with other half of dough.
Take the scrap dough (from cutting the circles) and reroll it to another circle shape, to make a third set of 16 cookies (which will usually be smaller and less perfect than the first two sets. That's OK- these are your testers that you eat yourself, and save the pretty ones for company!).
Don't reroll the dough more than once or too much gluten will form.

mix 1 egg white with 1 teaspoon cold water.
brush cookies with egg white glaze and sprinkle with sugar.
bake until golden, 15-20 minutes.
cool on a wire rack.

Note: you can also make almond or cinnamon rugelach with the same dough, just substitute the filling.

12. Pink Peppermint Meltaways


These mint meltaways are from page 113 of "The Betty Crocker Cooky Book".

INGREDIENTS
1 cup butter, softened
1/2 cup sifted powdered sugar
1 teaspoon peppermint extract
2 drops red food coloring
2 1/4 cups cake flour*
1/4 teaspoon salt
1/2 cup Andes peppermint candy baking chips (optional)

Preheat oven to 400F.
Cream butter, sugar, peppermint extract and food coloring thoroughly.
Measure flour and salt into a bowl, blend into butter mixture.
Drop by teaspoonfuls onto ungreased cookie sheet.
Bake for 8 minutes at 400 (F). Cookies should be set but not brown.
While warm, sift a light dusting of powdered sugar over cookies.

* cake flour is important to this recipe. Cake flour has less gluten than all-purpose flour so it makes a tender, melt-in-your-mouth cookie.
Sunday, December 6, 2009

Holiday Baking Logs

I was going through my cookbooks today and I found my Christmas baking logs from the past 18 years. I bake lots of different cookies each Christmas and being my usual hyper-organized self, I keep lists!
I thought it was time to get those lists onto my computer so I just typed it all out and decided I might as well blog it. These lists are an interesting artifact, to see how much or how little I made each year, what flavors were exciting me the most, etc.
In 2002 I made a lot more breads, muffins and scones because my ex-bf preferred them to cookies. It's also interesting to see which cookies keep making repeat appearances year after year, and which recipes are tried once and then dropped.

So without further ado...

Christmas Baking Log

1991
1. Rolled spice cookies
2. Reverse chippers aka pearls and chocolate (chocolate cookie, white chocolate chip)
3. Bright Eyed Susans
4. Lemon Spritz
5. Crisp Almond Slices
6. Mint-chocolate trees (green mint spritz, dipped in chocolate)
7. Buttermint kisses

1992
1. Rolled spice cookies
2. Reverse chippers / Rocky Road (chocolate cookie, white chocolate chip, nuts, marshmallow on top, covered in chocolate)
3. Lemon Spritz
4. Mint-chocolate trees (spritz)
5. Chocolate Spritz
6. Almond Spritz
7. Cuban Wedding Cakes (aka Mexican wedding cookies)
8. Chinese Almond Cookies
9. Sugar Cream Sandwiches
10. Chocolate Pretzels
11. Chocolate-orange bars


1993
1. Rolled spice cookies
2. Lemon Spritz
3. Mint-chocolate trees (spritz)
4. Reverse chippers / Rocky Road
5. Bright Eyed Susans
6. Sugar Cream Sandwiches
7. Chinese Almond Cookies


1994
1. Rolled spice cookies
2. Lemon Spritz
3. Mint-chocolate trees (spritz)
4. Bright Eyed Susans
5. Chinese Almond Cookies
6. Cuban Wedding Cakes


1995 (no records)
1. Rolled spice cookies
2. Lemon Spritz
3. Cuban Wedding Cakes
4. Glazed nuts
5. Spiced nuts


1996
1. Rolled spice cookies
2. Cuban Wedding Cakes
3. Lemon bonbons
4. Orange butter cookies
5. Butterscotch balls
6. Orange chocolate chip
7. Rose’s butter crescents
8. Brown sugar thins
9. English shortbread
10. Chocolate rolled cookies, dipped in white chocolate
11. Glazed almonds
12. Cinnamon pecans
13. Maple glazed walnuts


1997
1. Rolled spice cookies
2. English shortbread
3. Cuban Wedding Cakes (with hazelnut instead of pecan meal)
4. Cinnamon chip
5. Lemon chip
6. Chocolate-mint chip
7. Chocolate with white choc/raspberry chips
8. Orange-lemon Pandoro
9. Cocoa-cabernet pound cake
10. Glazed almonds


1998
1. Rolled spice cookies
2. Bright Eyed Susans (multicolor non-pareils)
3. Lemon cream cheese cookies frosted & lime jimmies
4. Chocolate-caramel chip
5. Chocolate-mint chip
6. Chocolate almond Biscotti
7. Storebought gingersnaps received as gift- I dipped them in chocolate and decorated
8. Orange Pandoro
9. Peppermint Bark
10. Pralines
11. Glazed almonds
12. Nephew’s B-day cake: scratch white cake, scratch lemon curd filling, scratch vanilla buttercream frosting
13. Thumbprint jam cookies
14. Cuban Wedding Cakes (with hazelnut instead of pecan meal)
15. Simply Perfect dinner rolls (yeast)
16. Cinnamon rolls


1999
1. Rolled spice cookies
2. Cuban Wedding Cakes
3. Lemon meltaways, frosted & lime jimmies
4. Caramel chip Toll House
5. Crisp sugar cookies, fiori di sicilia flavor
6. Rainbow chip brownies
7. Orange-currant mini-muffins
8. Glazed almonds (3 batches- vanilla, butter toffee, cinnamon)
9. Glazed sunflower seeds
10. Chocolate hazelnut Biscotti, dipped in white chocolate
11. Rolled spice cookies (second batch, painted ornaments)
12. Lemon bars
13. Lemon Pandoro
14. Lemon bread pudding
15. Crispy Buttercream chocolates (candy)


2000
1. Rolled spice cookies
2. Cuban Wedding Cakes
3. Lemon meltaways with lemon chips, pink frosted
4. English Shortbread
5. Chocolate chocolate chip cookies with pecans, dipped in white chocolate, with dark chocolate jimmies
6. Glazed almonds- English toffee flavor
7. Glazed sunflower seeds
8. Pandoro
9. Cocoa-cabernet pound cake

2001 (living with my ex)
1. Rolled spice cookies
2. Lemon bars
3. Chocolate chocolate chunk cookies
4. Cheese wafers
5. Cuban Wedding Cakes
6. Millionaire’s Shortbread
7. Lemon loaf cake with candied lemon peel
8. Glazed almonds- (cinnamon, vanilla)
9. Sunflower seed brittle


2002 (living with my ex)
1. Glazed almonds
2. Chocolate hazelnut Biscotti
3. Cuban Wedding Cakes
4. Chocolate chip cookies
5. Cheese Pennies
6. Butterscotch-pecan cookies
7. Beer Bread
8. Apple-whole wheat muffins
9. Pumpkin muffins
10. Pecan muffins
11. Currant muffins
12. Peach-spice scones
13. Blueberry scones
14. Cappuccino chip scones
15. Cinnamon pecan rolls


2003 (no records)

2004 (no records other than photo of Christmas day)
1. Cream puffs
2. Peach upside-down cake (using frozen home-grown peaches)
3. Bright-eyed susans
4. Pink peppermint meltaways
5. Glazed almonds

2005
1. Rolled spice cookies
2. Marshmallow crispy treats
3. Chocolate graham crackers with peppermint bark
4. Glazed almonds
5. Cherry-almond cookies (red sugar)
6. Pine nut cookies (green sugar)
7. Beautiful leaf-crust apple pie for Thanksgiving

2006
1. Rolled spice cookies
2. Cuban Wedding Cakes
3. Lemon bars
4. Toll house- with white chocolate chips & toffee bits
5. Marshmallow crispy treats
6. Pandoro
7. Cinnamon rolls in star-shaped pans
8. Mint Meltaways
9. Pink peppermint bark stars (in candy molds)


2007
1. Rolled spice cookies- polar bears (recipe in this blog)
2. Bright-eyed susans (recipe in this blog)
3. Cuban Wedding Cakes (recipe in this blog)
4. Mint Meltaways (recipe in this blog)
5. Millionaire’s shortbread (recipe in this blog)
6. Chocolate Rugelach (recipe in this blog)
7. Chocolate graham crackers with peppermint bark (recipe in this blog)
8. Glazed pecans (recipe in this blog)
9. Lemon loaf cake with candied lemon peel (recipe in this blog)
10. Black chocolate cake with nutella, Kahlua pastry cream, and chocolate buttercream frosting)
11. Cream puffs with key lime filling


2008
1. Rolled spice cookies (recipe in this blog)
2. Chocolate Pecan Pie, Thanksgiving (recipe in this blog)
3. Apple Tart
4. Banana Pecan Bread
5. Orange-cranberry-pecan scones (recipe in this blog)
6. Apple-pecan-cinnamon bread
7. Cinnamon glazed almonds
8. Dark chocolate-cherry-pecan clusters
9. Orange toffee glazed almonds
10. White chocolate, pecans, and dried cherries (candy)
11. Crunchy turtles: Pecans, caramel, marshmallow, chocolate, mini-rice crispies
12. Chocolate-mint rice crispy treats (recipe in this blog)
13. Bright-eyed susans (recipe in this blog)
14. Jam thumbprints
15. Rocky road brownies (recipe in this blog)

2009, so far
1. Thanksgiving: Chocolate Pecan Pie (recipe in this blog)
2. Thanksgiving: Pumpkin Pie
3. Banana-pecan bread
4. Cranberry bread
5. Apple-pecan bread
6. English shortbread, dipped in chocolate
7. Rolled spice cookies
8. Cuban Wedding Cakes aka Mexican wedding cookies
9. Key Lime Pie
10. Dark chocolate spritz cookies
11. pink peppermint meltaways
12. chocolate rugelach

Tuesday, November 17, 2009

Etsy mini test 3

the javascript version
there is no way to remove my name at the bottom of this one, but it doesn't have the flashing popup box

etsy mini test 2

flash version with some code removed
I removed the extra links at the bottom and the "movie" parameter but it did not get rid of that flashing popup box.

eek

testing etsy mini for favorites

Flash version iwith the text and links at the bottom edited

eclipse
Buy handmade
eclipse

Monday, September 28, 2009

Milestones

Last week, I realized I had just missed my 3 year Etsyversary. I was looking in my shop for another reason on Monday, and I realized that the previous day was the date I joined Etsy . September 20, 2006.
Last year on my second Etsyversary, I made some special commemorative ACEO's and this year the whole thing just slipped my mind.
Then on Tuesday, a friend reminded me that the traditional gift for a 3rd anniversary is leather!
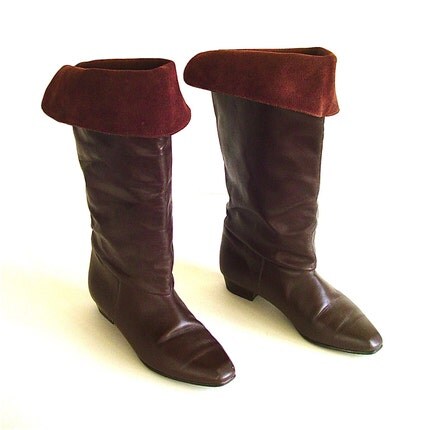
This was all the rationalization I needed to buy myself these fabulous vintage boots as an Etsyversary present!


Then I got looking at more and more vintage shoes and boots. Oh how I love fall weather (aka BOOT WEATHER) and how I love leather and SUEDE!
These are all shoes and boots on Etsy that I am currently lusting after. Click to see full size.


Item listings:
29988582, 31398666, 31160298, 31546116
28854817, 31480078, 31192839, 28266976
25026078, 31160332, 30633522, 30985709

I cannot really justify 12 new pairs of shoes, though. The two black pairs in the second row are to DIE for, but I currently have about 30 pairs of black shoes. What's a girl to do?? Post a comment and vote for your favorite pair.


Last week was also my mother's 80'th birthday! Now THAT'S a milestone!
I made her a lemon meringue pie instead of a birthday cake.

Thursday, September 17, 2009

White chocolate, fruit & nut clusters

Today I had a craving for something sweet, so I made up a recipe for some candy just using ingredients I happened to have in my pantry.
I had a handful of almonds, about 1/4 of a bag of white chocolate chips, just leftovers from other baking adventures.
So I sort of threw in everything but the kitchen sink! They came out pretty tasty.


First I decided to candy the almonds, although you could use plain roasted nuts or even raw nuts. That's the beauty of this recipe, just use whatever you have on hand.
---------------------------------------------------------
Candied almonds INGREDIENTS:
1 cup whole raw almonds
1/2 cup granulated pure cane sugar
2 tablespoons butter
Combine nuts, sugar and butter in heavy skillet. I use a cast iron skillet. Do not use a teflon-coated pan. Some candy-makers believe that sugar melts better in a copper pot, but I've never cooked with copper pots!
Cook over medium heat, stirring constantly with wooden spoon, until nuts are toasted and sugar is golden brown and the consistency of a thick syrup. (about 15 minutes)Sugar should not be grainy.
If you want to test with a water glass, the syrup should be in the hard crack stage.
Remove from heat and stir in 1/2 teaspoon vanilla.
Spray a piece of aluminum foil with non-stick spray (like Pam).
Spread the nuts onto the foil in an even layer.
Let the candy cool, then break into 1 or 2 nut clusters.

BE CAREFUL AND USE OVEN MITTS, and wear long sleeves. This molten sugar syrup is HOT and sticky so if some gets on you it is like napalm. It will burn you and take some skin off with it when you peel it off.
---------------------------------------

Then I melted about 1/4 of a bag of white chocolate chips in the microwave, in a medium size pyrex bowl. I had a few pink candy melts left from Valentines day baking, so I threw them in there too, just to use them up. That's why the color is sort of off-whitish.
To melt chocolate, use a low power setting like 30%. Do it one or two minutes at a time, take out and stir, then nuke it another minute. (at low power)
repeat until the chocolate is melted.

Stir into the melted chocolate:
the chopped-up candied almonds
a couple handfuls of craisins (dried cranberries)
a handful of of Quaker Oatmeal Squares cereal (brown sugar flavor)

Stir it all together until everything is coated in chocolate.
Spread it out on a plate that you sprayed with Pam. (or rub some butter on the plate)
Put the plate in the fridge until the chocolate hardens.
Remove plate from fridge and chop up the candy into chunks.

Yummy!

You can use milk chocolate or dark chocolate instead of white.
You can use any kind of nuts.
You can use raisins, dried cherries, banana chips, any kind of dried fruit.
You can use almost any kinds of breakfast cereal, to add crunch.

This would be good with milk chocolate, peanuts, cheerios and banana chips.
Just look around your pantry for leftover stuff you can mix in!

Thursday, August 6, 2009

WATERMELON GRANITE

Today was hot so tonight I made some Watermelon Granite.
watermelon granite
Granite (pronounced Granita and sometimes spelled Granita) is an easy frozen treat you can make without an ice cream maker!
I have also made this in lemon and in red wine flavors.


WATERMELON GRANITE

5 cups peeled and seeded watermelon chunks (from about a 3-pound slice of watermelon)
½ cup sugar (or sugar to taste depending on how sweet the melon is)
Juice of one lemon or lime


Place the watermelon chunks in a blender or food processor and blend on high speed until very smooth.

Strain the watermelon puree in a mesh strainer, Push on the pulp with the back of a large spoon to squeeze out all the juice.
discard pulp.

Transfer the watermelon juice to a mixing bowl and add the sugar and lemon/lime juice. Stir until the sugar is completely dissolved. Not all watermelons are the same sweetness so I don't really measure the sugar, I sweeten to taste. Note that sweetness gets weaker when it's frozen so you want to over-sweeten it a bit in the juice stage.

Pour the juice into a metal baking pan that will fit into your freezer. I use a 9"x9" square brownie pan. Put that on a freezer shelf for about 20 minutes.

Remove the pan from the freezer and use a fork to scrape any ice crystals from the sides of the bowl. Break up any solid chunks. Stir to incorporate the crystals. Return to the freezer.

Repeat the scraping procedure every 15-20 minutes, rake the fork through the pan to break up the crystals, then return the pan to the freezer.
Keep doing this until the consistency is fluffy and “snowy” when scraped with a fork or spoon, at least 4 hours.

Then scoop into bowls or dessert glasses and serve.
It's very good with a crisp nutty cookie such as these
http://chezlatina.com/I/chezlatina_1702_12056958.jpg

Saturday, July 18, 2009

Knitted Eyeball

I originally posted this tutorial on Instructables.com on Jan 31, 2009

Intro: This is a fun, easy knitting project using the Knifty Knitter knitting looms. Knitted eyeballs of different sizes make great Halloween decorations. Make a whole set in different eye colors, to match all your family members!

This project is suitable for older children, too, as long as they are old enough to use a (fairly dull) plastic yarn needle.


step 1Materials

The Materials you will need to make this project:

1. Knifty Knitter set of knitting looms.
These come in 4 sizes, for this project I am using the smallest loom (the blue one) but you can use any size. I have made larger eyeballs using the green loom.

2. Yarn- I am using Lion Brand Vanna's Choice. If you are using one of the larger looms you will want to either use thicker yarn (bulky weight) or use a double strand of worsted weight.
1 skein of white yarn
1 skein of black yarn (you won't use very much black so if you have some leftover from another project that is perfect)
1 skein of blue yarn (or brown or green, whatever eye color you want to make)
1 small skein of red yarn or red embroidery floss, I used Sugar 'n' Cream crochet yarn.

3. scissors

4. Poly fiberfill stuffing


step 2Getting started

You will start with the white yarn.
The knitting process follows the basic Knifty Knitter instructions, I'm assuming if you own the looms you have used them before and know the basics.

Cast on with the white yarn and begin to knit a tube.

Knit until the white tube is about 5 inches* long.

*5 inch measurement pertains to using the smallest loom. If you are using a larger size loom, these length measurements will be larger.


step 3Changing colors

Now you want to switch to the blue yarn.
(or brown or green, whatever eye color you chose)

Leave a tail of the white thread anchored to the outside peg, and wrap the next circle of loops using the blue yarn.
Continue knitting with the blue yarn a few more times around, and then tie off the tails of blue and white in a knot together. Pull the tails of the knot inside the tube to weave in later.


step 4Knitting the pupil

Knit about an inch and a half* of the blue yarn, then change colors to black.
Follow the same color changing directions as in step 3.

Now knit about an inch and a half with the black yarn.
When you are done, anchor the tail to the outside peg and cut the yarn leaving about a 6 inch tail.

  • Inch and a half measurement pertains to using the smallest loom. If you are using a larger size loom, these length measurements will be larger.


step 5Remove eyeball from the loom

Wrap a piece of black yarn around the outside of the loom to measure it, and cut a piece about 6 inches larger than the loom circumference.

Thread the piece of black yarn in the plastic yarn needle that came with your Knifty Knitter loom.
Use the yarn needle to lift the last set of loops off the loom, one by one, following the basic Knifty Knitter directions.
This piece of yarn will serve as a drawstring to close the pupil, once the eyeball is off the loom.


step 6Tying the drawstring

Now your knitted tube should be off the loom and look something like this.
It looks long and skinny but don't worry, the tube will stretch quite a bit when it is stuffed.

Turn the tube inside out, and pull the last black piece of yarn tight from booth sides like a drawstring, closing off the black end. Tie them in a tight knot and also tie those 2 tails to the black tail from the tube.

Weave in the ends of these tails and the tails from both times you changed colors.

Turn the tube right side out again.


step 7Stuff the eyeball

Start to stuff the eyeball through the white end, which will still be open.
Use white poly fiberfill stuffing, it will still be somewhat visible through the holes in the knitted tube, but it won't fall out.
It won't be as visible through the blue and black sections because they are not stretched as much.

A tip from myrrhmaid on Instructables: use a length of pantyhose as a liner to keep the stuffing from coming out. Great tip!

Stuff it until you get a nice rounded shape, it can even be a little oval shaped like a nearsighted eyeball.

When you think it is full enough, thread some of the white yarn with the plastic yarn needle and thread it through the bottom loops on the white end of the tube.
Close it tight and tie it off using the same drawstring method you used on the black end.
Weave in ends.


step 8Add the bloodshot veins!

Now you could stop here, it's a perfectly nice little eyeball. Roly-poly and soft, all ready to be thrown at someone! But something is missing! To make a good Halloween decoration, you really need some veins.

Cut some of the red yarn, about 24 inch pieces are easiest to handle.
Thread one of the pieces in the plastic yarn needle and start "embroidering" veins onto the eyeball. I just improvised this step, weaving the red yarn in & out, over & under until it looked good. When you reach a stopping point like the end f a vein, just tie off the yarn in a knot and cut off the excess.
This is really a creative license thing, you can make the veins as simple or as branched as you like. No two eyeballs are alike in real life, so no two knitted eyeballs will be alike either.

Friday, July 17, 2009

Tutorial: T-shirt hacking

edit July 25:
This tutorial was featured of Totally Tutorials Blog. They have lots of other great tutes so check it out!
---------------------------------------
This is a tutorial to take a big, boxy, unflattering T-shirt from Michael's craft store, like this one:
(click any photo to see it larger)


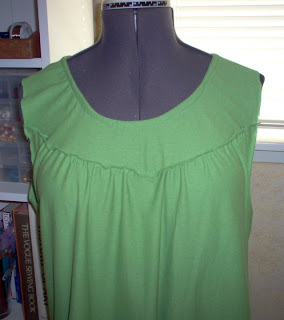
And reconstruct it into a cute, girly, puffed-sleeve babydoll Tee like this one:


Michael's T-shirts really don't look that great on a woman's body. They have some good points: they are inexpensive, and they come in a lot of nice colors, but that boxy crew-neck cut just doesn't thrill me. So I decided to see what I could do with the standard T-shirt to make it cuter.
This week my local Michael's had blank tees on sale for $2.50 each, for any size. I picked up this pretty lemon-lime color.

Materials needed:
1 t-shirt
some thin elastic (optional, if you want gathered sleeves like mine)
scissors
sewing machine, thread, etc.

For this project: Buy a tee that is 1 or 2 sizes larger than you would normally wear. I bought an XL. (unlike American Apparel, these XLs really are EXTRA large, I think they are mens sizing)

First I sketched out what I wanted to make. I designed a top with a flat piece on the shoulders and upper chest, called a yoke, and then a loose, gathered section on the body. The front yoke is curved because I think that's more flattering, and the back yoke is straight across.
I added puffed sleeves.

The only seams you will need to sew on this top are:
2 armhole seams
front yoke
back yoke
finishing the neckline.
The side seams, shoulder seams, and hems are already done for you.


Phase One: CUTTING

1. Cut off both sleeves from the t-shirt, following the armhole seam.


2. Trim off the armhole seam from the sleeves. Set the sleeves aside.


3. Cut the front layer ONLY into a curved shape, starting about halfway up the armhole.
DO NOT CUT THROUGH BOTH LAYERS.
Try to make your curve symmetrial, you can do half of it and then fold the shirt to mark your cutting line, to make sure the other side matches.


4. Cut the back layer straight across, at the same height as the highest points of the front layer. (the sides.)


5. Cutting the yoke.
First you want to trim the shoulders because the oversized boxy tee probably had the armhole seam halfway down your bicep. We want the new armhole seam to be right at the natural shoulder. Hold the yoke up to your body or use a well-fitting shirt to determine where to trim the shoulders. Discard the two shoulder trimmings.


6. Cutting the neckline.
I don't like crew neck tops, they aren't comfortable or flattering. I wanted a deeper scoop neck which I think is more feminine. Trim off the neck ribbing and set that aside, you will reuse it.
Cut the front layer ONLY of the yoke into a deeper U-neckline. The back layer should stay at the higher level.


7. Trim the bottom of the yoke: Trim the front yoke into a curved shape, and trim the back yoke straight across. Discard the excess you trimmed from the bottom of the yoke.


Here is the final yoke piece, all trimmed and opened flat. You can see the difference between the back yoke and front yoke shapes.

step 8. (no photo)
Take the neckline ribbing you set aside in step 6. Trim the ribbing from the rest of the scrap fabric and the tag. You just want to salvage about a 1 1/2 inch wide strip of ribbing. It will be like a long loop. Stretch it out by gently pulling on it. It should stretch quite a bit once all the seams are cut off.


Phase Two: SEWING

9.The first thing. you want to sew is to finish the neckline. It's easier to do this while the yoke is separate.
Pin the ribbing to the neckline of the yoke, pin it to the wrong side (inside) of the yoke.
It should be long enough to bind the neckline after you have stretched it.
Now sew the ribbing to the wrong side of the neckline. Do not stretch the neckline of the yoke as you sew, you should only stretch the ribbing as needed to fit the yoke.


This is the wrong side of the yoke, with the ribbing sewn on.


10. Now you will fold the ribbing over to the right side (outside) of the yoke neckline. Fold the ribbing to cover the seam allowances and encase all the raw edges. Pin and sew the ribbing down to the right side of the yoke. This is one of the most important parts to do neatly, especially the front neckline, since it is the closest to your face. Most people won't notice a funky sleeve but will notice a crooked neckline.


Here you can see the ribbing area in the back is finished, and the ribbing near the needle is folded over about to be sewn.


Here is the yoke, with the neckline ribbing finished.

11. Attaching the body to the yoke.
With pins, mark the center point of the front and back yoke, and the center points of the front and back body pieces.


12. Set your machine stitch length to a long basting stitch, and baste along the top edge of the front and back body pieces. Also baste just along the top half of both sleeve pieces. Leave your threads dangling and both ends.


13. Pin the front yoke to the front body piece, right sides together, matching centers and matching sides. Pull on the loose basting threads like a drawstring, to gather the front body piece to fit the yoke. Distribute the gathers to be fuller right over your boobs.

14. Now sew the front yoke seam.
If you have a serger, you can do this in one step. Sergers are the best for sewing with t-shirt knits.
I don't have a serger so I sewed a straight seam, then I trimmed the excess seam allowance, and then used a mock-overlock stitch to finish the edges.
Repeat this process with the back yoke and back body pieces. You can distribute the gathers evenly across the back. Pin and sew the back yoke to the back body.


Here is the top viewed inside-out, with the front and back yokes finished.

15. The next step is to add the sleeves, which you set aside in a previous step.
There is no left or right sleeve, they are identical.
Pin the sleeve to the armhole, right sides together. Match up the side seam of the body to the underarm seam of the sleeve, and match the shoulder seam of the body to the top shoulder crease of the sleeve.
Distribute any gathers to the top of the shoulder area.
Now sew the armhole seam as you have pinned it.
If you have a serger, you can do this in one step.
I don't have a serger so I sewed a straight seam, then trimmed the excess seam allowance, and then used a mock-overlock stitch to finish the edges.
Sew on both sleeves.


Here is the top with sleeves added. This is the front view.


Here is the top with sleeves added. This is the back view.
Now you could wear the shirt just like this, if you like straight loose sleeves.
But I wanted puffed sleeves so this last step is optional.

16. To make the sleeves puffed, I added elastic to the sleeve hem. You don't need to make a casing for the elastic, because the existing hem will become your casing.
Measure around your upper arm and subtract a couple of inches. Cut 2 pieces of narrow elastic to this length. You can use 1/8" wide elastic, or 1/4 " wide, whatever you have on hand that will fit in the sleeve hem. If the elastic is stiffer or less stretchy, then only subtract one inch from your arm measurement.


Cut two small holes on the inside layer of the sleeve hem, one hole on each side of the underarm seam. Do not cut all the way through both layers the hem to the outside, you want these holes to be invisible from the outside.
Do this for both sleeves.


Attach a safety pin to one of your elastics.


Poke the safety pin into one of the small holes you cut. Use the safety pin to thread the elastic through the casing, until you get to the other small hole. Pull the safety pin and elastic out the other hole.

Tie both ends of the elastic together in a secure knot. Trim the ends and tuck the knot into one of the holes.
If you used wider elastic you can also sew the 2 ends together for a smooth flat joint, because a knot may be too bulky.


Here is the finished puffed sleeve from the outside.

Design ideas:
You can screen print on the shirt or add other embellishments to the yoke area.
You can buy two shirts in different colors, and then swap the yokes. So you can make a top with a black yoke, and pink sleeves and body, and another top with a pink yoke, and black sleeves and body. Give one to your friend and you will be opposite-twins!