
We all have some childhood nostalgia for those Hostess chocolate cupcakes, with their iconic squiggle on top. But with your grown-up palate, they just don't pass muster for taste. So I decided to make some lookalike cupcakes from scratch.
Step 1:
Bake a dozen chocolate cupcakes from your favorite recipe or from a cake mix.
This is my favorite recipe:
Peerless chocolate cake
this makes one layer, 8" or 9" round pan, or 12 cupcakes.
preheat oven to 350.
line a cupcake pan with 12 paper liners.
Melt 1 oz (1 square) UNSWEETENED baking chocolate (not
semisweet) in a double boiler or a microwave at a
low/defrost setting. Don't scorch it. Set aside to
cool.
cream together with electric mixer:
1/4 cup softened butter (I use unsalted for baking)
3/4 cup granulated sugar
1 egg
1 teaspoon vanilla
mix in cooled chocolate.
sift together into a bowl:
1 cup cake flour (it must be cake flour, not all-purpose flour)
3/4 teaspoon baking soda
1/4 teaspoon salt
Add the flour mixture to the chocolate-butter mixture,
mixing at low speed with electric mixer. Add in 1/2
cup ice cold water and beat til smooth at medium
speed. Batter should be light, smooth, kinda fluffy.
Pour batter into prepared cupcake pan, filling the cups about 2/3 full.
Bake 20 to 25 minutes or until toothpick inserted in center comes out clean
-------------------------------
Step 2:
Cream filling:
1/4 cup crisco shortening (not butter flavored)
1/3 cup marshmallow creme or marshmallow fluff
1/4 cup powdered sugar
1/2 tsp vanilla
pinch salt
Beat all ingredients together with mixer until fluffy. You may add a little milk, a few drops at a time, to get the right consistency.
Put the cream filling into a ziplock baggie and cut off the tip of one corner.

Step 3:
With a pointy serrated knife, cut out a conical section from the top of each cupcake. You hold the knife at an angle to make the cone.
Then cut off the tip of the cone-shaped plug, so that you have a flat cap of cake left.
(you can eat or discard the tip of the cone)

step 4:
Squeeze the ziplock baggie to pipe the cream filling into the cone-shaped hole in the top of each cupcake. Don't fill it all the way to the top, because you will replace the cap of cake on the top.

Step 5: These cupcakes have been filled and the caps are back on top, covering up the filling.

Step 6: Frost the cupcakes with your favorite chocolate frosting recipe, or you can use canned frosting. I made a simple chocolate buttercream with:
powdered sugar
cocoa
melted unsweetened baking chocolate (1 square)
softened butter
vanilla
milk
I didn't use a recipe or measure anything, I just eyeball it, mix it up and then add a little milk as needed to get the right spreading consistency.

Step 7:
squiggles
Mix about 1/3 cup of powdered sugar with a little milk. I did not measure the milk, I just add it a few drops at a time and then stir, repeating until I get the right consistency. Do NOT add too much milk at once!
When you get the right consistency, it should not be too liquidy because you want the squiggles to hold their shape.
Put the white frosting in another ziplock bag and cut off a tip of the corner. You will cut a much smaller hole for this than you did to pipe the filling.
Squeeze the bag and pipe the white squiggles on each cupcake.
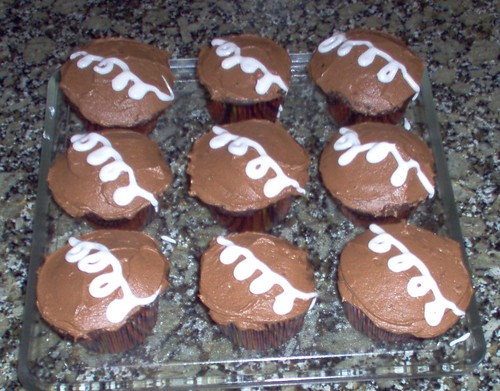
step 8: OmNomNom!!
This cupcake has a bite taken out showing the cream filling center.

serve with ice cold milk!

No comments:
Post a Comment